


 2022-08-10
in
2022-08-10
in

 19 min read
I’m starting to experiment with a Firebase alterantive called Supabase . It provides a lot of the same centralized login/user management Firebase does but with a relational (Postgres) database and object storage for their storage layer. Javascript and Flutter are their big supported platforms. I wanted to give it a try through their Flutter Quickstart Guide (they have one for many different Javascript frameworks). After completing it though I ran across this blog post about the new SDK 1.0 Developer Preview . There are several changes to the Flutter SDK to make things better as they march towards the 1.0 release. I decided to tweak the Quickstart to work under the 1.0 version and document it here. Some of the earlier text is substantially from or copy/pasted from the original tutorial.
Introduction
This quickstart tutorial will walk us through creating a simple user management app using Supabase and Flutter. This will illustrate how to interact with Supabase through the new 1.0 Supabase Flutter SDK (in preview at time of this writing). It will also highlight four parts of the Supabase system:
- Supabase Database will be used for storing the user profile data
- Supabase Auth will be used for handling authentication. We will be using a passwordless e-mail magic link authentication and account creation method but there are many other options from email/password to a laundry list of industry standard single sign on systems.
- Without having to do anything we leverage the inherent row level security provided by the database layer to make it so that users can only see their data.
- Without having to do anything we automatically have an API to our backend thanks to Supabase’s Instant API functionality too.
After some simple setup we will be able to get a simple user management app that will allow users to login and set their username and website address. When rendered in the browser it will look like this when it is completed:
Note, that this style of email only magic link login will only work for Android, iOS, and Web out of the box at this time. It is targeted to eventually work across all the desktop deployments as well eventually and other methods can be used for the desktop logins that work perfectly fine. The final solution can be found in this GitLab repository .
Create a project
Go to https://app.supabase.com/ , the main app dashboard for your user. If you don’t have one you can easily create one with your GitHub account (the only way to make a user at this time) through single sign on. Once that is created you will be presented with the project dashboard showing all of your projects (which you will have none):
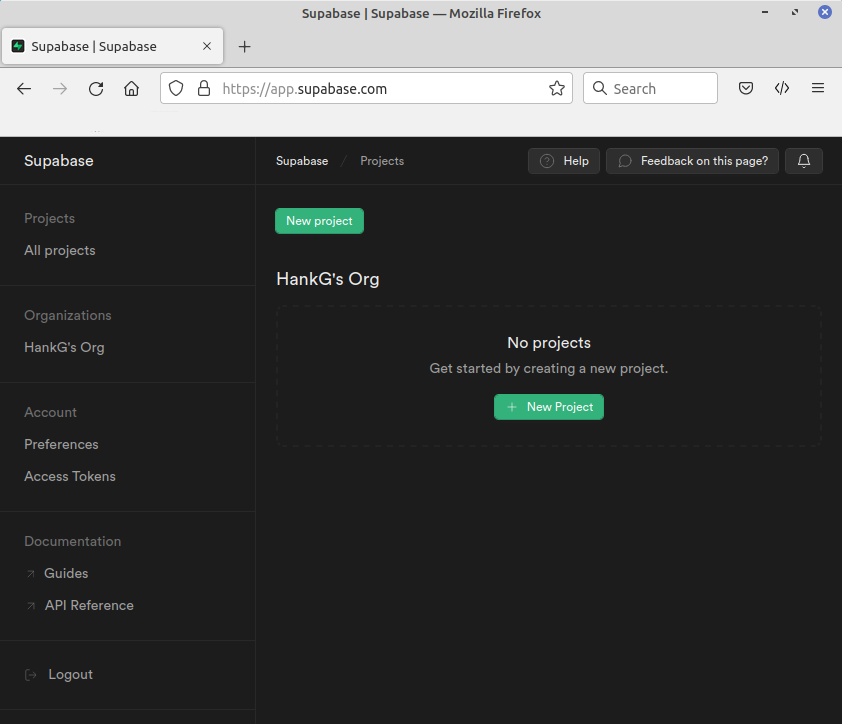
Each user is granted two free projects. Click the “New Project” button to create yours. You will then be presented with the below screen:

The defaults should be good for all these fields. Choose whichever name you like. For the database password, this will give unfettered access to your data so it should be a strongly generated one. There is a convenient link on the screen that will auto-populate that field with a strong password which you can then copy out and store in your password vault. With those options chosen click “Create New Project”.
It will then drop you to the project screen while it finishes building your system. Once it is completed, within a minute later. It will look similar to this:
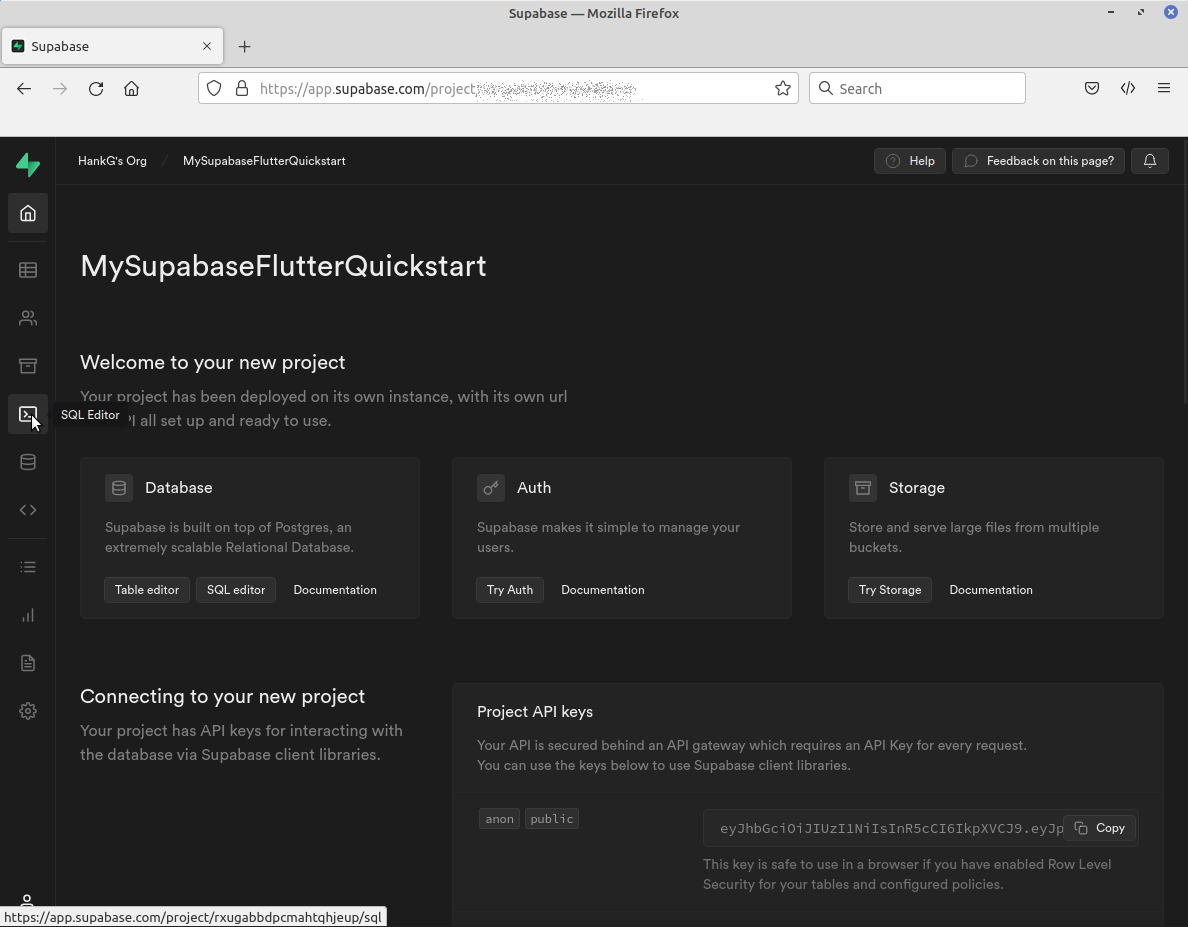
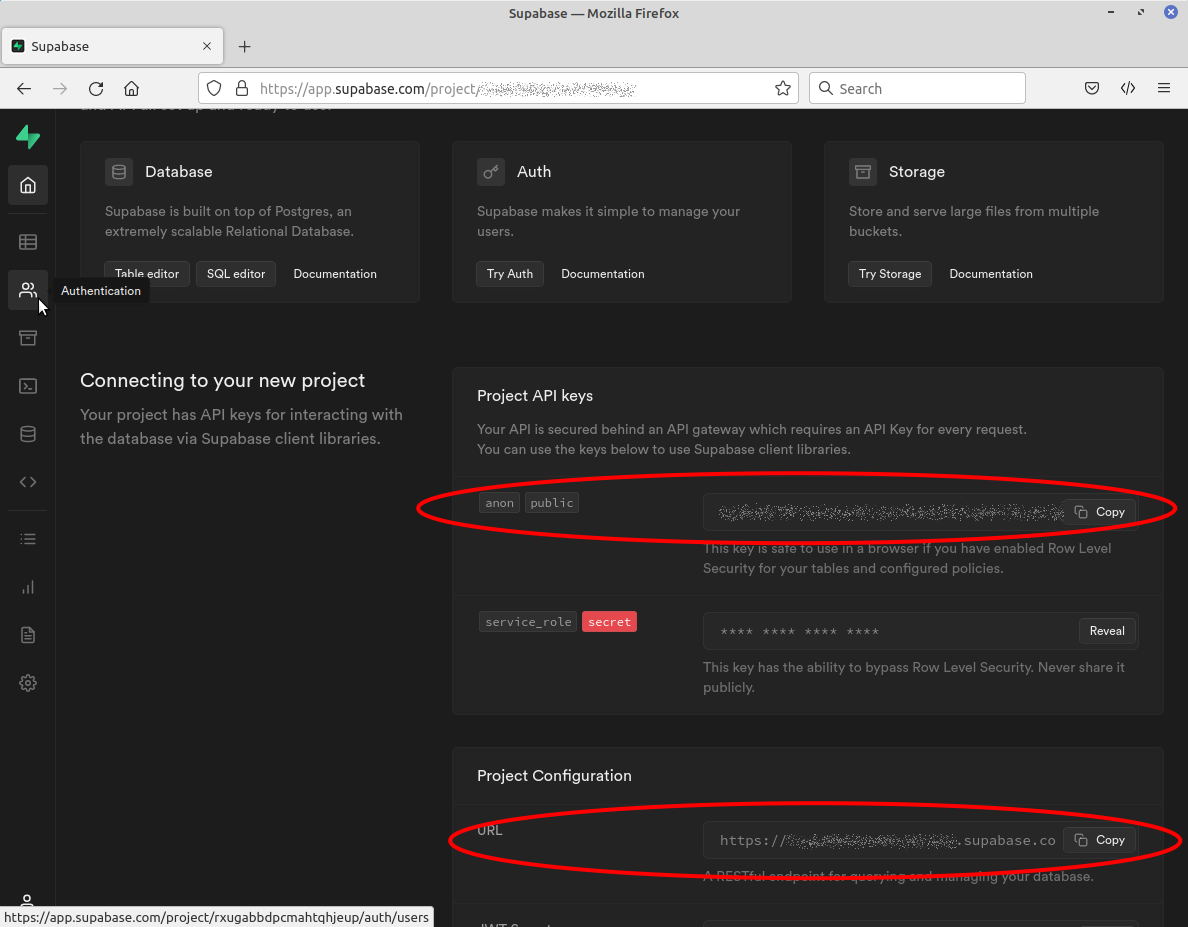
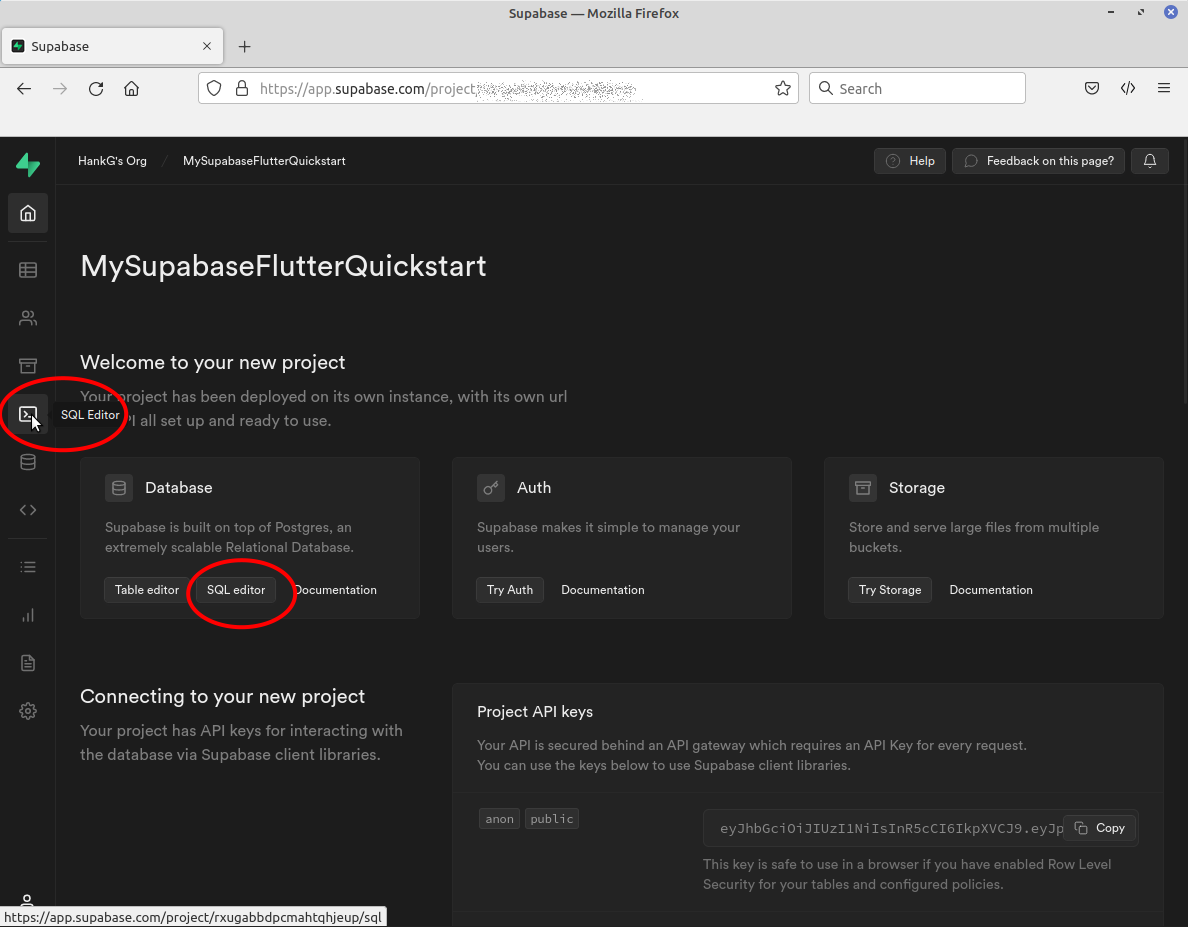
This will give you quick and easy access to the different parts of your project, as well as being able to get access to it via the toolbar on the far left. Two values we will want for later on this screen will be the “anon public” Project API Key and the Project URL. Both are circled in red below:
Copy those and save them for later in a text file or remember where they are when they are time to enter them into our code. You can always get back to this screen by hitting the Home icon on the toolbar.
Create Database Schema
The backend layer of Supabase is a well configured PostgreSQL database with data replication, back ups, row-level encryption etc. You can see a whole host of other Postgres extensions that can be applied to it. Therefore at any point you’ll be able to directly manipulate the database in the same way you would a Postgres installation you built from scratch. However Supabase does have some easy getting started scripts for showing you the way. One that we will use is the “User Management Starter” which is tailored for this tutorial.
Click on the “SQL Editor” button on your project home page or in the toolbar (highlighted below):
This brings you to the editor page where there are several script guides. Scroll down to the “Quick start region”.
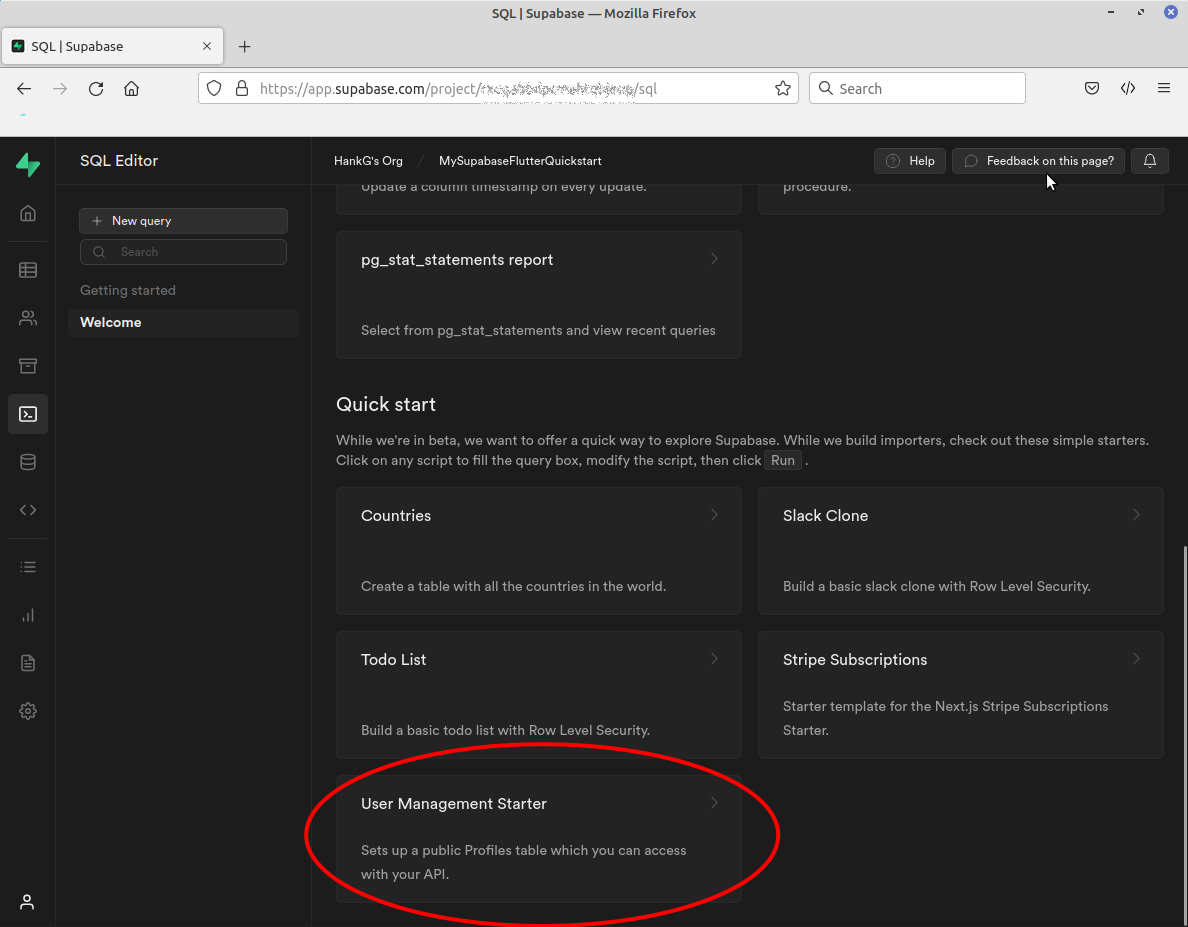
Cick on the “User Management Starter” brings up a SQL Editor panel populated with that script:
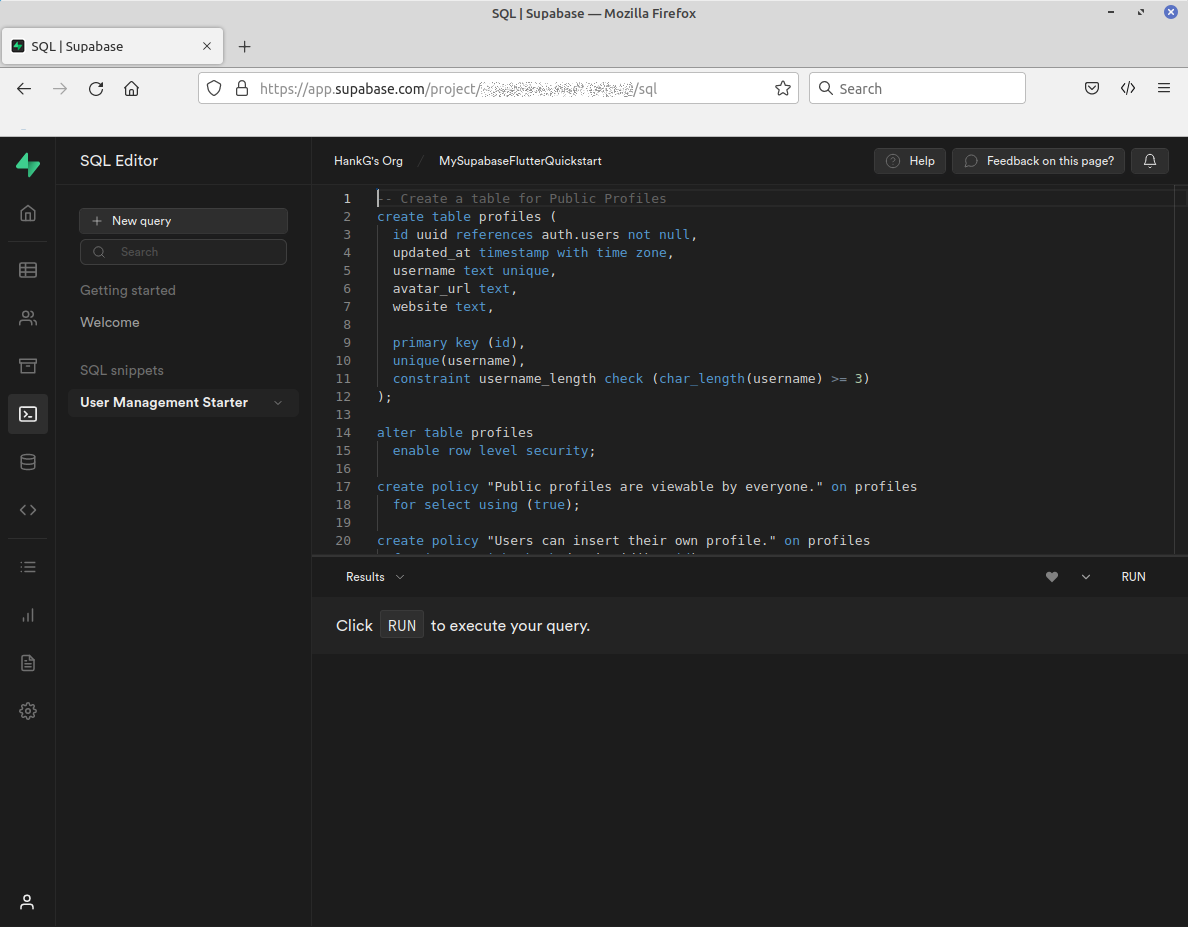
Now click the highlighted “RUN” button to have it applied. The Result block will cycle as work is done ending with “Success. No rows returned”. You are now ready to begin xuilding the application.
Building the Application
Initialize the Flutter Application
In the directory you want your top level project to exist type:
flutter create supabase_quickstart
Then navigate into that directory:
cd supabase_quickstart
…and add the Supabase Flutter library as a dependency. We want to add the 1.0 version specifically, which at the time of this writing was in preview release as 1.0.0-dev.3 according to the package’s pub.dev page
. Update this to the correct 1.x version current when you execute these steps:
flutter pub add supabase_flutter:1.0.0-dev.3
Setup Deep Links for iOS or Android
Now that we have the dependencies installed let’s setup deep links so users who have logged in via magic link or OAuth can come back to the app. Click on the “Authentication” icon on the toolbar:
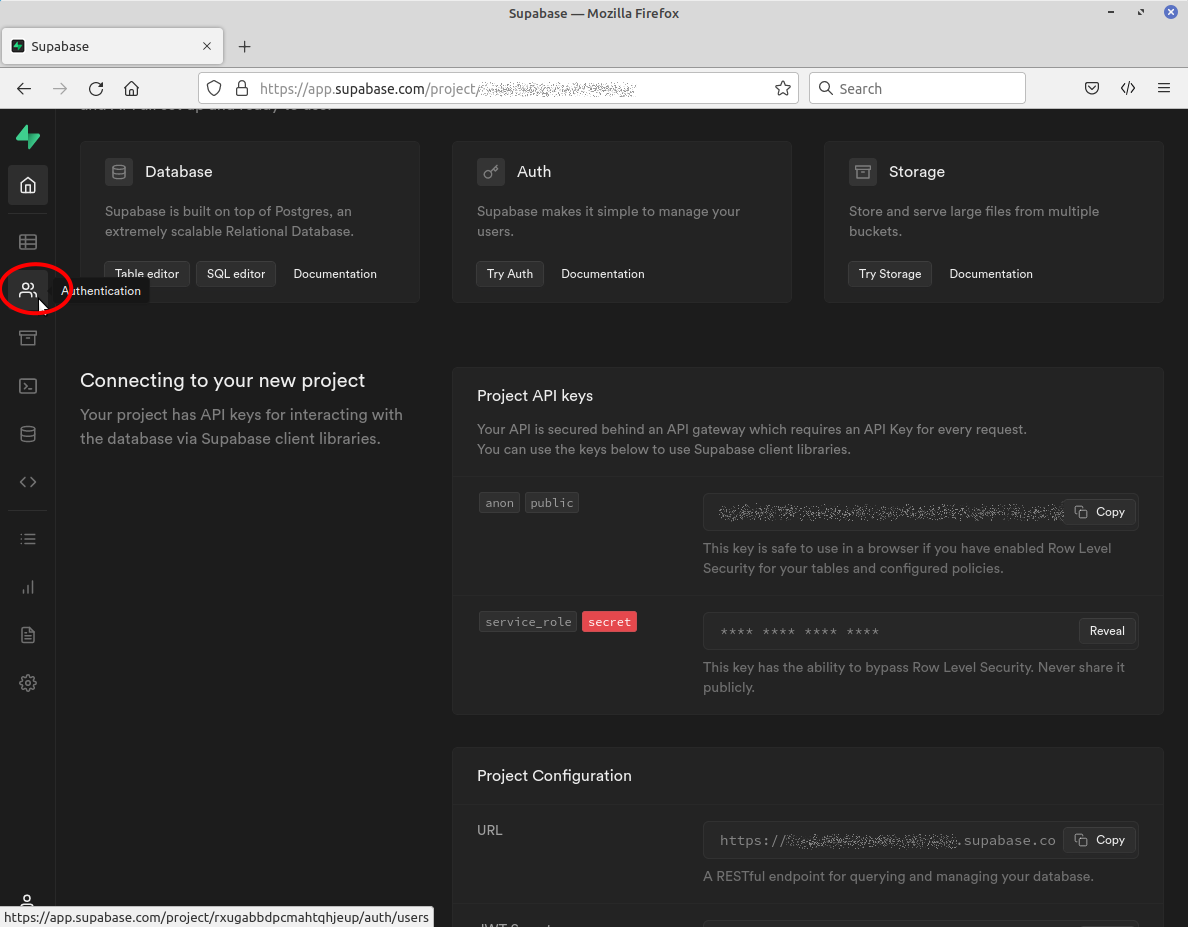
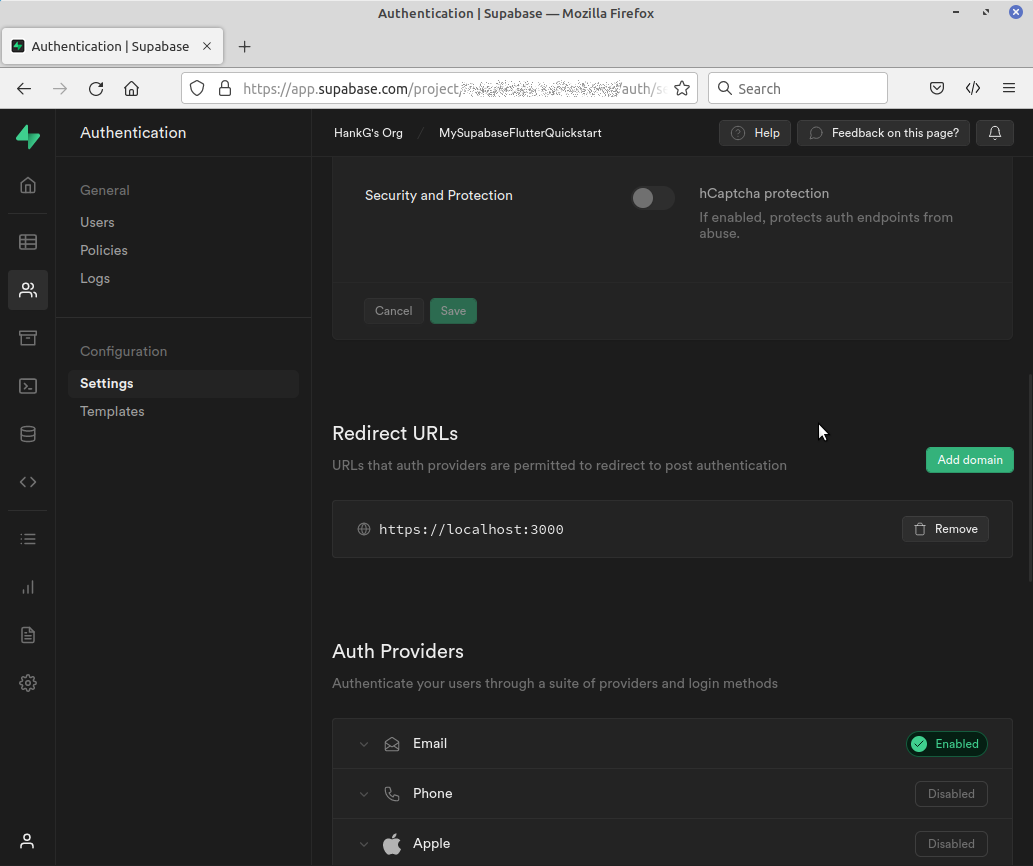
Then click on the “Settings” option to bring up the project’s authentication settings. We will want to add a redirect for our applications. Scroll down to the Redirect URLs section and you’ll see the one for localhost, which will be sufficient for the development web based deployment scheme.
We will want to add a new domain. Hit the “Add Domain” button and fill it in with an deep link data:
io.supabase.flutterquickstart://login-callback/
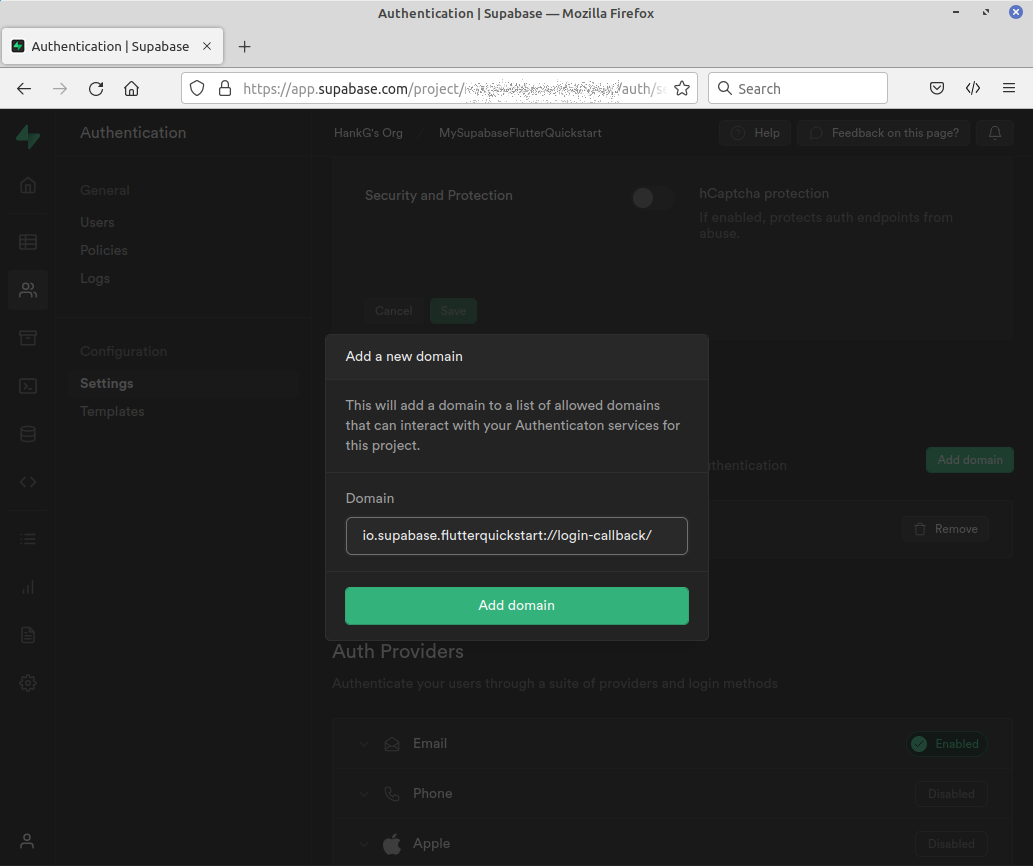
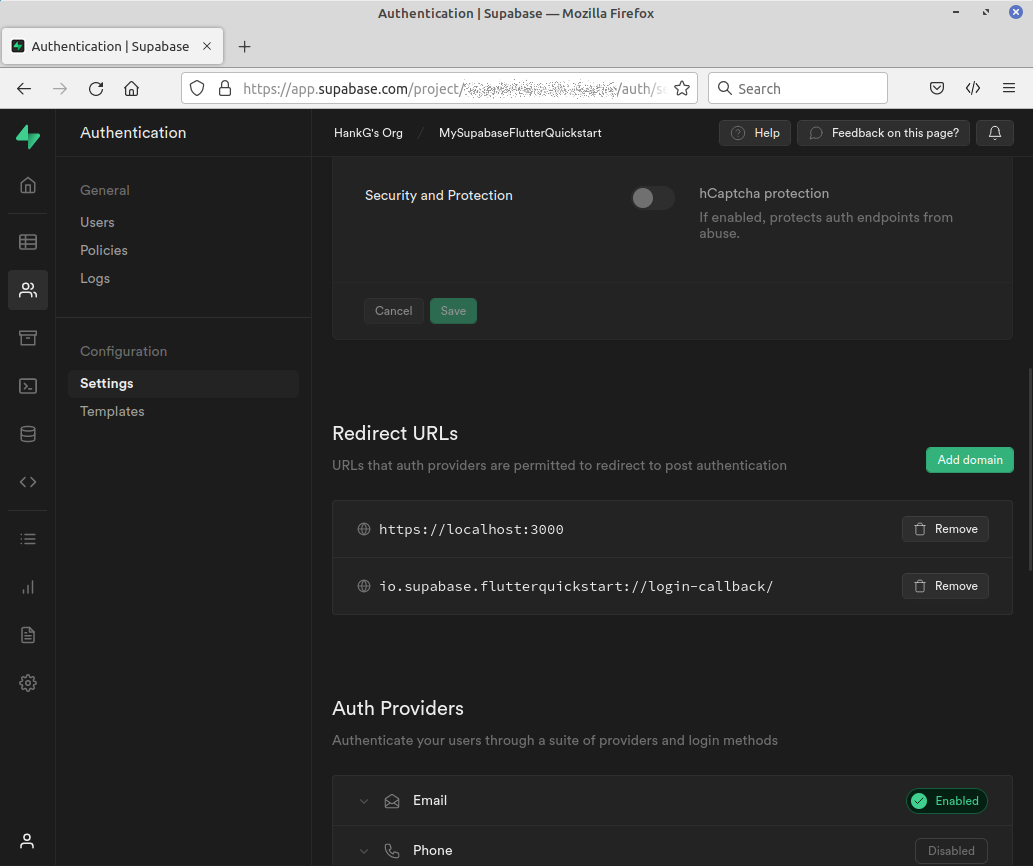
Hit the “Add Domain” button and you will then see the two domains:
We now need to update our Android and/or iOS configurations to reflect that. For Android, add an intent-filter to enable deep linking by going into the android/app/src/main/AndroidManifest.xml and adding:
<manifest ...>
  <!-- ... other tags -->
  <application ...>
    <activity ...>
      <!-- ... other tags -->

      <!-- Add this intent-filter for Deep Links -->
      <intent-filter>
        <action android:name="android.intent.action.VIEW" />
        <category android:name="android.intent.category.DEFAULT" />
        <category android:name="android.intent.category.BROWSABLE" />
        <!-- Accepts URIs that begin with YOUR_SCHEME://YOUR_HOST -->
        <data
          android:scheme="io.supabase.flutterquickstart"
          android:host="login-callback" />
      </intent-filter>

    </activity>
  </application>
</manifest>
For iOS add CFBundleURLTypes to enable deep linking in the ios/Runner/Info.plist file:
<!-- ... other tags -->
<plist>
<dict>
  <!-- ... other tags -->

  <!-- Add this array for Deep Links -->
  <key>CFBundleURLTypes</key>
  <array>
    <dict>
      <key>CFBundleTypeRole</key>
      <string>Editor</string>
      <key>CFBundleURLSchemes</key>
      <array>
        <string>io.supabase.flutterquickstart</string>
      </array>
    </dict>
  </array>
  <!-- ... other tags -->
</dict>
</plist>
Again, for the web there is nothing to do. Now we can get to the code itself:
Create a Splash Page
We will want to have a splash page landing pad as a default route if things aren’t initialized yet. In the project lib directory create a new file named splash_page.dart and paste the below into it:
import 'package:flutter/material.dart';

class SplashPage extends StatelessWidget {
  const SplashPage({Key? key}) : super(key: key);

  @override
  Widget build(BuildContext context) {
    return Scaffold(
        body: Center(
          child: Column(
            mainAxisAlignment: MainAxisAlignment.center,
            crossAxisAlignment: CrossAxisAlignment.center,
            children: const [
              Text('Supabase Quickstart Example'),
              SizedBox(height: 24),
              CircularProgressIndicator(),
            ],
          ),
        ));
  }
}
Now lets build an application that navigates to this page:
import 'package:flutter/material.dart';
import 'package:supabase_quickstart/splash_page.dart';

void main() {
  runApp(const MyApp());
}

class MyApp extends StatelessWidget {
  const MyApp({Key? key}) : super(key: key);

  @override
  Widget build(BuildContext context) {
    return MaterialApp(
        title: 'Supabase Flutter Quickstart',
        theme: ThemeData.dark().copyWith(
            primaryColor: Colors.green,
            elevatedButtonTheme: ElevatedButtonThemeData(
                style: ElevatedButton.styleFrom(
                  onPrimary: Colors.white,
                  primary: Colors.green,
                ))),
        initialRoute: '/',
        routes: <String, WidgetBuilder>{
          '/': (_) => const SplashPage(),
        });
  }
}
We will be leveraging the use of Flutter routes and the Navigation capability to get around for this demo. With the new Supabase SDK routing and state management are very Flutter standard. As you can see we’ve done some theming but set our initial route to the only route which is to our splash page. Run the app by executing
flutter run -d chrome
You should see a screenshot like:
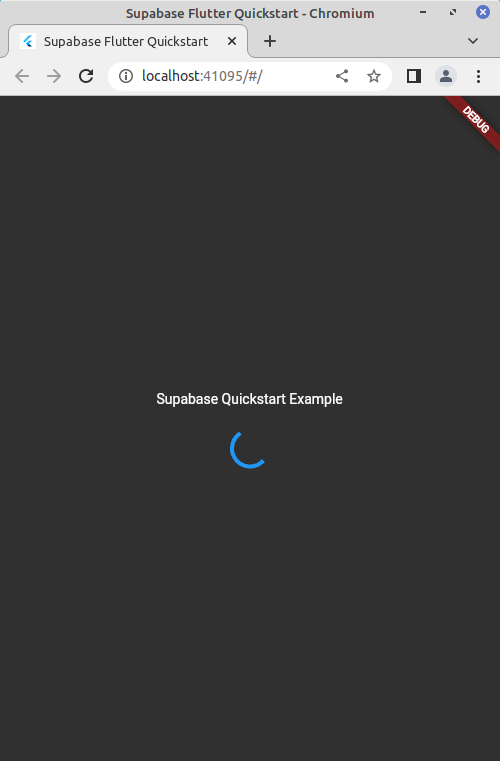
We are now ready to start wiring in our additional features.
Add Utility Constants and Extensions
First let’s build some helper functions and variables. Create a new file in the lib directory called constants.dart and paste the below into it:
|
|
Line 4 is giving us a convenient global variable for referencing the Supabase client instance. Line 5 is giving us a global “navigator key”. This will be very helpful when we need to do routing between pages as a consequence of authentication/login status. The remainder is an extension method that adds the ability to easily add “Snackbar” notifications" to our app.
Create Login Page
Now lets build the login page. Create a new file in the lib directory named login_page.dart and paste in the following values:
import 'package:flutter/foundation.dart';
import 'package:flutter/material.dart';
import 'package:supabase_flutter/supabase_flutter.dart';
import 'package:supabase_quickstart/constants.dart';

class LoginPage extends StatefulWidget {
  const LoginPage({Key? key}) : super(key: key);

  @override
  State<LoginPage> createState() => _LoginPageState();
}

class _LoginPageState extends State<LoginPage> {
  bool _isLoading = false;
  final _emailController = TextEditingController();

  Future<void> _signIn() async {
    setState(() {
      _isLoading = true;
    });

    try {
      await supabase.auth.signIn(
          email: _emailController.text,
          options: const AuthOptions(
            redirectTo: kIsWeb
                ? null
                : 'io.supabase.flutterquickstart://login-callback/',
          ));
      context.showSnackBar(message: 'Check your email for login link!');
      _emailController.clear();
    } catch (error) {
      context.showErrorSnackBar(message: error.toString());
    }

    setState(() {
      _isLoading = false;
    });
  }

  @override
  void initState() {
    super.initState();
  }

  @override
  void dispose() {
    _emailController.dispose();
    super.dispose();
  }

  @override
  Widget build(BuildContext context) {
    return Scaffold(
        appBar: AppBar(title: const Text('Sign In')),
        body: ListView(
          padding: const EdgeInsets.symmetric(vertical: 18, horizontal: 12),
          children: [
            const Text('Sign in via the magic link with your email below'),
            const SizedBox(height: 18),
            TextFormField(
              controller: _emailController,
              decoration: const InputDecoration(labelText: 'Email'),
            ),
            const SizedBox(height: 18),
            ElevatedButton(
                onPressed: _isLoading ? null : _signIn,
                child: Text(_isLoading ? 'Loading' : 'Send Magic Link')),
          ],
        ));
  }
}
Most of this is standard Flutter UI and forms code. The _signIn method is the only thing that is at all Supabase specific. The core of the method is:
try {
    await supabase.auth.signIn(
        email: _emailController.text,
        options: const AuthOptions(
        redirectTo: kIsWeb
            ? null
            : 'io.supabase.flutterquickstart://login-callback/',
        ));
    context.showSnackBar(message: 'Check your email for login link!');
    _emailController.clear();
} catch (error) {
    context.showErrorSnackBar(message: error.toString());
}
Let’s explore that. First you can see that the Supabase client has a built in sign in method. The way we are using it here it is the Magic Link method because we are only providing an email address. If we were to provide a username and password it would use that option instead. The same goes for the other supported authentication methods. As part of the call we have specific options we need to provide, in this case the redirect. For this we are testing if we are deployed as a website, in which case we set the redirect to null. If we are not then we use that redirect that we specified on the authentication page. If all goes well we complete and show a snackbar to that effect. The Supabase SDK uses exception throwing for error control. So if something goes wrong, like we aren’t allowed to do this because we sent too many requests in too fast, it will throw an exception which we capture and report back.
Now let’s build the account page assuming that we are logged in.
Create Account Page
Create a file in the lib directory named account_page.dart and paste the below into it:
import 'package:flutter/material.dart';
import 'package:supabase_flutter/supabase_flutter.dart';
import 'package:supabase_quickstart/constants.dart';

class AccountPage extends StatefulWidget {
  const AccountPage({Key? key}) : super(key: key);

  @override
  State<AccountPage> createState() => _AccountPageState();
}

class _AccountPageState extends State<AccountPage> {
  final _usernameController = TextEditingController();
  final _websiteController = TextEditingController();
  var _loading = false;

  @override
  void initState() {
    super.initState();
    final user = supabase.auth.currentUser;
    if (user == null) {
      Navigator.of(globalAppNavigatorKey.currentContext!)
          .pushNamedAndRemoveUntil('/login', (route) => false);
    }
    _getProfile(user!.id);
  }

  Future<void> _getProfile(String userId) async {
    setState(() {
      _loading = true;
    });

    try {
      final data = await supabase
        .from('profiles')
        .select()
        .eq('id', userId)
        .single();
      if (data != null) {
        _usernameController.text = (data['username'] ?? '') as String;
        _websiteController.text = (data['website'] ?? '') as String;
      }
    } on PostgrestException catch (error) {
      // 406 error is okay, means that the profile data hasn't been set yet
      if (error.code != "406") {
        context.showErrorSnackBar(message: error.message);
      }
    }

    setState(() {
      _loading = false;
    });
  }

  Future<void> _updateProfile() async {
    setState(() {
      _loading = true;
    });

    final userName = _usernameController.text;
    final website = _websiteController.text;
    final user = supabase.auth.currentUser;
    final updates = {
      'id': user!.id,
      'username': userName,
      'website': website,
      'updated_at': DateTime.now().toIso8601String(),
    };

    try {
      await supabase.from('profiles').upsert(updates);
      context.showSnackBar(message: 'Successfully updated profile!');
    } catch (error) {
      context.showErrorSnackBar(message: error.toString());
    }

    setState(() {
      _loading = false;
    });
  }

  Future<void> _signOut() async {
    try {
      await supabase.auth.signOut();
    } catch (error) {
      context.showErrorSnackBar(message: error.toString());
    }
  }

  @override
  void dispose() {
    _usernameController.dispose();
    _websiteController.dispose();
    super.dispose();
  }

  @override
  Widget build(BuildContext context) {
    return Scaffold(
        appBar: AppBar(title: const Text('Profile')),
        body: ListView(
          padding: const EdgeInsets.symmetric(vertical: 18, horizontal: 12),
          children: [
            Text('User email: ${supabase.auth.currentUser?.email}'),
            TextFormField(
              controller: _usernameController,
              decoration: const InputDecoration(labelText: 'User Name'),
            ),
            const SizedBox(height: 18),
            TextFormField(
              controller: _websiteController,
              decoration: const InputDecoration(labelText: 'Website'),
            ),
            const SizedBox(height: 18),
            ElevatedButton(
              onPressed: _updateProfile,
              child: Text(_loading ? 'Saving...' : 'Update'),
            ),
            const SizedBox(height: 18),
            ElevatedButton(
              onPressed: _signOut,
              child: const Text('Sign Out'),
            ),
          ],
        ));
  }
}
Again there is a lot of standard Flutter UI stuff but we are doing some more Supabase specific stuff in the initState, _signOut, _getProfile and _updateProfile methods. The _getProfile method is used to populate our page with information from the database. The core of it is:
try {
    final data = await supabase
        .from('profiles')
        .select()
        .eq('id', userId)
        .single();
    if (data != null) {
    _usernameController.text = (data['username'] ?? '') as String;
    _websiteController.text = (data['website'] ?? '') as String;
    }
} on PostgrestException catch (error) {
    // 406 error is okay, means that the profile data hasn't been set yet
    if (error.code != "406") {
    context.showErrorSnackBar(message: error.message);
    }
}
The heavy lifting is being done by the await call to the supabase query. This code is saying that we will try to pull a single value from the profiles table where the id equals our id. If the data isn’t null, and it shouldn’t be if it made it that far, then we will try to pull the username and website value out of the return value.
Again, Supabase uses exception handling for error control so we wrap this in a try/catch block but this one is a bit more than just catch any errors and report. We are looking for a specific error, where the code is equal to “406” because if the code is 406 it means there was no data not a bigger error. This happens if the user never set this before. Any other error we want to propagate as a proper error.
Along with populating the form we want to be able to update. The core of the _updateProfile method is:
final userName = _usernameController.text;
final website = _websiteController.text;
final user = supabase.auth.currentUser;
final updates = {
    'id': user!.id,
    'username': userName,
    'website': website,
    'updated_at': DateTime.now().toIso8601String(),
};

try {
    await supabase.from('profiles').upsert(updates);
    context.showSnackBar(message: 'Successfully updated profile!');
} catch (error) {
    context.showErrorSnackBar(message: error.toString());
}
We get the current values of the username and website from our text field controllers (standard Flutter methodology). Next we are building up a map of key/values that we are going to push into our database. These correspond with the “API” that was automatically generated by Supabase based on our database’s schema. These are the column names of the profiles table. We can “upsert” these values (update if it exists or insert if it doesn’t) assuming we have permission to that row. Any errors are again captured and reported.
Lastly we have the _signOut method that allows the user to sign out:
  Future<void> _signOut() async {
    try {
      await supabase.auth.signOut();
    } catch (error) {
      context.showErrorSnackBar(message: error.toString());
    }
  }
As you can see Supabase has a standard signout method that we can leverage for this purpose.
There is some more Supabase stuff in our initState method, which is called when the system first builds our page:
  @override
  void initState() {
    super.initState();
    final user = supabase.auth.currentUser;
    if (user == null) {
      Navigator.of(globalAppNavigatorKey.currentContext!)
          .pushNamedAndRemoveUntil('/login', (route) => false);
    }
    _getProfile(user!.id);
  }
In this case we want to make sure that a logged in user exists before we try to do anything. This is a precaution in case we somehow got directly created when no one is logged in. We do this by checking if the client has a currentUser. If it does then we populate the page with our user’s profile data. If it does not then we use Flutter navigation to go to the login page.
All of this authentication/state management stuff happens in the Supabase code we just have to look for relevant changes so that we bring up the login page if we aren’t logged in, show the account page if we are signed in already, etc. That is all going to be wired together in our main application object
Wire it together
Finally let’s get Supabase initialized and our app handling the change in login state. To do this we will replace the contents of the main.dart file with:
import 'package:flutter/material.dart';
import 'package:supabase_flutter/supabase_flutter.dart';
import 'package:supabase_quickstart/account_page.dart';
import 'package:supabase_quickstart/constants.dart';
import 'package:supabase_quickstart/login_page.dart';
import 'package:supabase_quickstart/splash_page.dart';

Future<void> main() async {
  WidgetsFlutterBinding.ensureInitialized();
  await Supabase.initialize(
    url: 'https://<Your ID>.supabase.co',
    anonKey: 'Your ANON Key',
  );
  runApp(const MyApp());
}

class MyApp extends StatelessWidget {
  const MyApp({Key? key}) : super(key: key);

  @override
  Widget build(BuildContext context) {
    Supabase.instance.client.auth.onAuthStateChange((event, session) {
      switch (event) {
        case AuthChangeEvent.signedIn:
          Navigator.of(globalAppNavigatorKey.currentContext!)
              .pushNamedAndRemoveUntil('/account', (route) => false);
          break;
        case AuthChangeEvent.signedOut:
          Navigator.of(globalAppNavigatorKey.currentContext!)
              .pushNamedAndRemoveUntil('/login', (route) => false);
          break;
        default:
          break;
      }
    });

    return MaterialApp(
        navigatorKey: globalAppNavigatorKey,
        title: 'Supabase Flutter Quickstart',
        theme: ThemeData.dark().copyWith(
            primaryColor: Colors.green,
            elevatedButtonTheme: ElevatedButtonThemeData(
                style: ElevatedButton.styleFrom(
                  onPrimary: Colors.white,
                  primary: Colors.green,
                ))),
        initialRoute: supabase.auth.currentUser != null ? '/account' : '/login',
        routes: <String, WidgetBuilder>{
          '/': (_) => const SplashPage(),
          '/login': (_) => const LoginPage(),
          '/account': (_) => const AccountPage(),
        });
  }
}
Let’s look at some of the bigger changes. First the main method:
Future<void> main() async {
  WidgetsFlutterBinding.ensureInitialized();
  await Supabase.initialize(
    url: 'https://<Your ID>.supabase.co',
    anonKey: 'Your ANON Key',
  );
  runApp(const MyApp());
}
You will need to put in your specific URL and Anon Keys here to get this to work. Beyond that a couple of things have changed. First we made the method asynchronous. We wanted to do this because we wanted to wait for the Supabase initalization to complete. The first line actually waits for the application state to finish initializing before doing anything else. This means that stuff like local storage has been properly wired up, among other things. Next we initialize Supabase with the URL and anonymous public key that for the project. These were the values you set aside after the project creation from the project home page. Supabase uses these to initialize itself, then read local storage for a previous login state if available, etc. When this method returns everything should be properly initialized for us and ready for use.
Next lets look at our app. First we have the routes:
routes: <String, WidgetBuilder>{
    '/': (_) => const SplashPage(),
    '/login': (_) => const LoginPage(),
    '/account': (_) => const AccountPage(),
}
Now we have all three routes definied, one each for the splash page, the login page, and the account page. This will be used anywhere we want to use the Flutter Navigator to push/pop named routes. We then need to tell the application which route to start off with initially:
initialRoute: supabase.auth.currentUser != null ? '/account' : '/login',
Here we are using an inline if statement to set the value to take us either to the account page or the login page depending on if there is a current authenticated Supabase login session. If when Supabase initialized it stored the login information, which it does automatically, and it is still a current login, then currentUser will be populated when it comes time to build the app object. We can therefore go to the account page. If it isn’t then we go to the login page. What about when we go from being logged out to logged in and vice versa while the app is running? How do we capture that? We do that by adding an onAuthStateChange listener at the top of the build method on our main application class:
Supabase.instance.client.auth.onAuthStateChange((event, session) {
    switch (event) {
    case AuthChangeEvent.signedIn:
        Navigator.of(globalAppNavigatorKey.currentContext!)
            .pushNamedAndRemoveUntil('/account', (route) => false);
        break;
    case AuthChangeEvent.signedOut:
        Navigator.of(globalAppNavigatorKey.currentContext!)
            .pushNamedAndRemoveUntil('/login', (route) => false);
        break;
    default:
        break;
    }
});
The AuthChangeEvent type actually has six different values: passwordRecovery, signedIn, signedOut, tokenRefreshed, userUpdated,userDeleted. This method will get called whenever there is a state change in the authentication state. So if the application starts up with an authenticated user and they never log out this will never get called. We want to properly route if there is a change only in being signed in or signed out. If we are signed in then we want to go to the account page first. If we are signed out then we want to go back to the login page. We are using the Flutter Navigator methods to do that. The only thing that may look a bit unorthodox to seasoned Flutter developers is this globalAppNavigatorKey.currentContext! context that we are using.
We created that value global value in our constants.dart file and we set the navigatorKey field on the MaterialApp to use that. This allows us to have a top level navigation key that will persist for the lifespan of the application. Because this listener is persistent for the life of the application we can’t put this inside of one of the pages and expect it to work since the pages are swapped in and out throughout the life of the application as we route frome one place to the other.
Testing your Application
Launch your application again with:
flutter run -d chrome
You will not see the splash page this time but instead the login page:
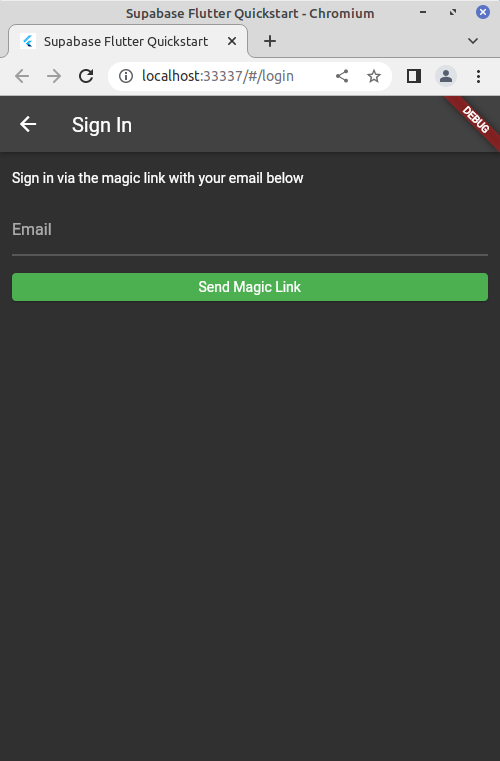
You can now put an email in to have the magic link sent to. If this is the first time your Supabase project has seen this email address it will create a new user for it. If it has seen it before it will log you into your old account. You will see the button change state as it goes through the various back-end communications and you will see a notification at the bottom with the success or error status of that interaction with the Supabase back end.
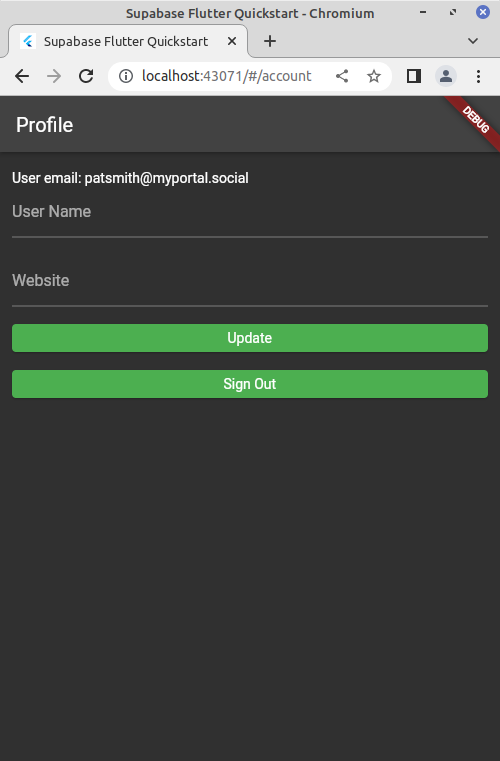
Once you receive the email copy the link data and paste it into the URL bar of your browser that the app is running in. Once you do that you will see the account screen:
You see the email address, which will match the one you used. You will see the User Name and Website fields are blank. Fill them in and hit “Update” to push those to update those. Again you can see the buttons and status updates as that happens. If you create a new tab and paste the root of your website (such as http://localhost:43757/) then you will see that you are not asked to log in because we are already logged in. It brings you right to the account page with your updated values. This login state will persist as long as the web server keeps running. You can hit the sign out button to log yourself out now too.
At this point you have completed the creation of your first Flutter app using the Supabase back end.