


 2022-07-30
in
2022-07-30
in

 24 min read
The main Friendica documentation has install instructions for setting up the core part of the system. However it assumes that you have properly installed all the dependencies and leaves securing the system as an exercise to the user. While I have found a couple of tutorials around the internet like this one or this one to fill in the gaps before that I have found them a little lacking and dated as well. I was able to make my way through it but I’m not sure if all will. I therefore decided to write this soup to nuts tutorial on standing up a Friendica instance with Ubuntu 22.04. Please use the table of contents to skip parts that you don’t need, like setting up your cloud instance.
Assumptions
This tutorial assumes that you want to install Friendica on the internet accessible to anyone else on the internet with a standard domain name (mysuperawesomedomain.com) or (friendica.mysuperawesomedomain.com). It also assumes that you will want to install this with HTTPS only access that will automatically work with client browsers. It also assumes that you will be using this server solely for hosting Friendica. This tutorial assumes some knowledge or familiarity with Linux and the command line as well, although I try to be as explicit as possible with each of the steps.
Lastly it is assuming that you are installing with Ubuntu 22.04 with . These instructions may work on different versions of Ubuntu, Ubuntu based distros, or Debian based distros. However these instructions were vetted solely on Ubuntu 22.04. To help with truly from scratch bootstrapping it will have a section of how to create such a machine in Digital Ocean, but the instructions beyond that should work for any Ubuntu 22.04 installation. It also assumes that the root username/password has been disabled for the server, which will be a relevant part when you get to the securing of the database section.
Lastly, this tutorial was done for setting up my Friendica Development Test server at https://friendicadevtest1.myportal.social
. For convenience I’ll sometimes use permutations of that in examples or you’ll see it when I use extracts from configuration files. You will need to replace that with your own domain name in those steps.
Example Machine Building Steps with Digital Ocean
Before beginning the installation steps below you will need an installation of Ubuntu 22.04. This section does this within Digital Ocean. Before being able to do this you will need to have a registered domain name ready to go. You can go to a service like Namecheap or other places to register a domain and for instructions on how to set it up to point to your cloud provider’s domain name servers (DNS). This section covers important steps for creating a server in Digital Ocean but similar configurations and options will be available in any system.
Once you are logged into Digital Ocean at the top right of the screen you will see a green “Create” button. This has a drop down menu which allows you to create a new server, known as a droplet, in their cloud
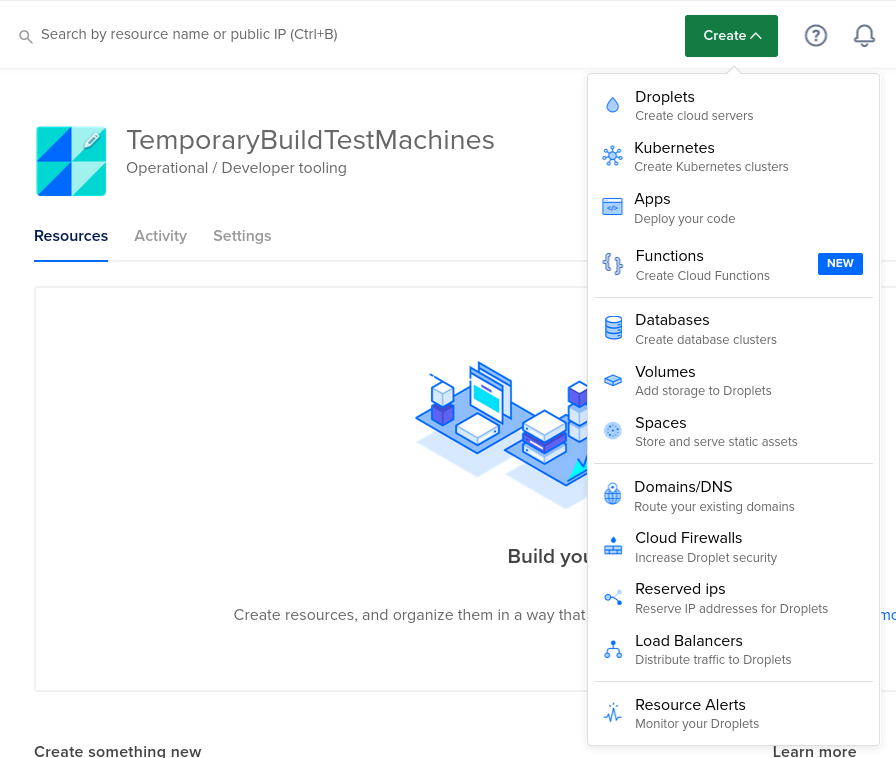
From there you will be presented with a screen of options to choose from to configure your droplet/server. Let’s look over each of the options and highlight importance of some of them.
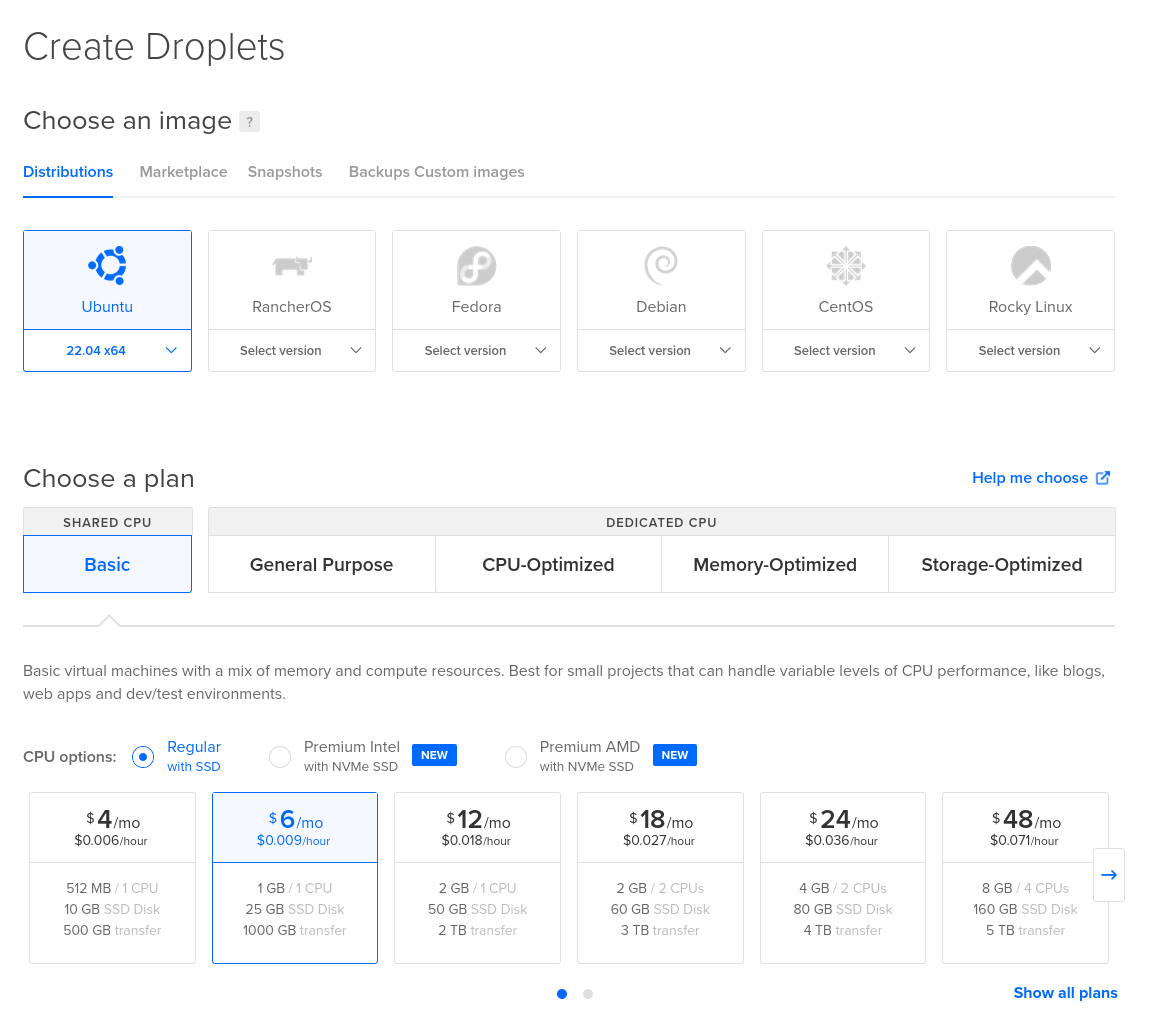
The first thing you’ll have to do is choose an operating system to run your Friendica instance with. This manual is written with Ubuntu 22.04 so to follow this guide that will be best. Any of the choices will work in general for Friendica though. Next you’ll have to choose a size. If you are doing a small instance you don’t need much power. I would recommend at least 1 GB of RAM and 25 GB of disk space though, so I wouldn’t go lighter than the $6 a month option (the one selected).

Next you’ll need to pick which data center you want your instance to run in. Again any option will be fine but you’ll want to consider things like being geographically close to your server or close to where your users will be. You may also feel more comfortable hosting it in some countries over others due to difference in privacy laws. There is no need to add block storage or change the VPC options so leave those as default.

We now need to setup our login paths to the server. I highly recommend using SSH keys not username/password logins. You’ll need to create and install SSH keys if you haven’t done so. Here is a guide on how to do that . This method of logins will make it impossible for attackers to brute force break into your server by guessing username/password combinations. It is still possible to leak SSH keys so vigilance is required as with anything else but it is one extra layer of protection. This tutorial is assuming you are using keys to secure the system. Therefore on certain steps, like the securing of the database, only follow the recommended defaults if you have done so as well.
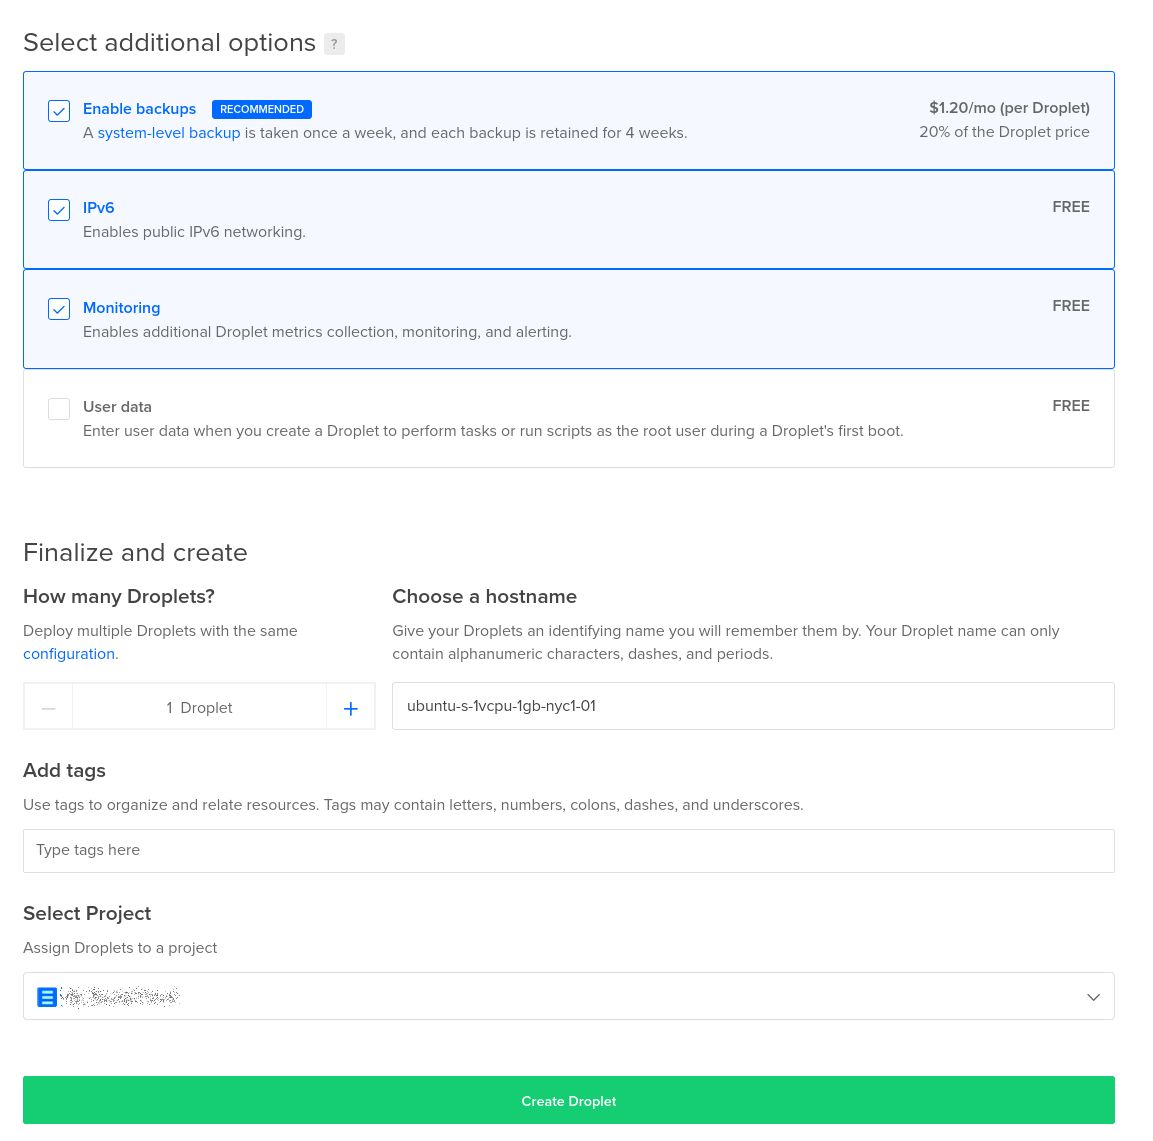
Now we can configure some additional nice to haves. I like to have regular backups of my server. That way if there is a catastrophic failure it is possible to roll back to at least some relatively recent state. I also like having IPv6 access to my site for IPv6 aware networks. I like monitoring as well so I can log into the Digital Ocean dashboard and check things. For the hostname you’ll want to choose something descriptive since it will be used elsewhere in our configuration process, especially the networking panel. This should not be a full internet domain however. So for example if you plan on making your server accessible at myawesomefriendicaserver.com you could name the server myawesomefriendicaserver here to make things easier.
With all that done you can hit the green “Create Droplet” button. Digital Ocean will start provisioning your server. Now it is necessary to set up the DNS entries to this server. As stated above this is assuming you’ve already gone through the process of creating a domain name with a register like Namecheap and have already configured the domain in Digital Ocean and Namecheap. On the far left Digital Ocean menu you’ll see the Network menu item. Select that and select the domain that you are adding this server to. For this server we will want to add IPv4 and IPv6 (if you selected that option) entries. Click on the “A” entry option to make the IPv4 entry and the “AAAA” entry for IPv6 entries:
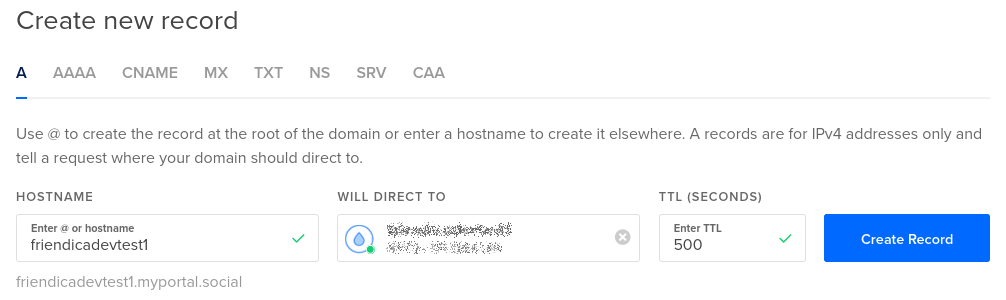
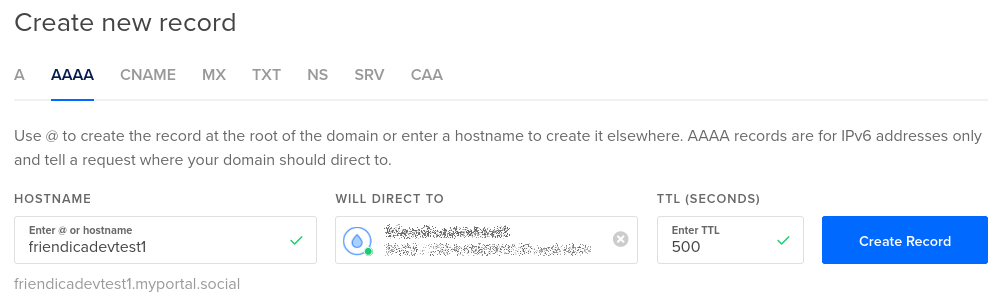
If you are adding this as the top-level domain server then the hostname field will be the default and you have nothing to enter. If you are going to make this a sub-domain then you will put the sub-domain name here. For our example we are configuring a server on friendicadevtest1.myportal.social so the field here is friendicadevtest1. The “Will Direct To” entry is a drop down. Clicking on it will bring up a list of servers of which your newly created droplet should be available. When you are initially setting this up you’ll want to set the TTL to a relatively small number like 5 minutes. This tells the world how long before it should check for an update of an entry. So if you make a mistake here and set it to 5 minutes then a change to fix it will take 5 minutes or so to take effect. If you use the default of 43200 seconds it will take half a day. Once you are sure everything is configured however you’ll want to set it up to a higher level.
Once all of that is configured you should be able to log into your new server from the command line on a machine that you have your SSH keys installed on. The command would be:
ssh root@<server-address>
Where <server-address> is the full internet domain name to your server. So for our example machine the command would be:
ssh root@friendicadevtest1.myportal.social
If you get some sort of an authentication error that means that your SSH keys on your client or on the server weren’t correctly setup. If it can’t reach the server try pinging it with the ping command to see if it resolves to the correct IP address.
ping <server-address>
Once logged in to the server do an update to make sure that you have the latest version of all the standard software and reboot.
apt update
apt upgrade -y
reboot
At this point you are now ready to go to the server configuration stages.
Configure and Secure Server
Install Unattended Updates
Digital Ocean automatically setups up unattended updates. However that configuration does not automatically configure rebooting when needed (such as kernel patches). For those with a stock Ubuntu install you’ll have to install the unattended upgrades software. I cribbed off this tutorial for the below steps in configuring unattended updates from beginning to end. The Ubuntu system has a very simple package for installing the unattended upgrades so that your server is always patched:
sudo apt update
sudo apt install unattended-upgrades update-notifier-common -y
Once that command is initiated you should be able to check the status that they are active with the command:
sudo systemctl status unattended-upgrades
Which should produce output that has a status like: Active: active (running);
Next we want to make sure we are configured to reboot on security patches that require reboot:
sudo nano /etc/apt/apt.conf.d/50unattended-upgrades
Look for the line that reads:
//Unattended-Upgrade::Automatic-Reboot "false";
You want to uncomment the line and set the value to true so it reads:
Unattended-Upgrade::Automatic-Reboot "true";
Lastly restart the service so that it takes the new values
sudo systemctl restart unattended-upgrades
Install Apache
Installing Apache is very straight forward:
sudo apt update
sudo apt install apache2 -y
If you properly configured your DNS settings to point to this server you should now see the default Apache website screen when you go to your domain, such as below when you navigate to http://<yourdomainname> :
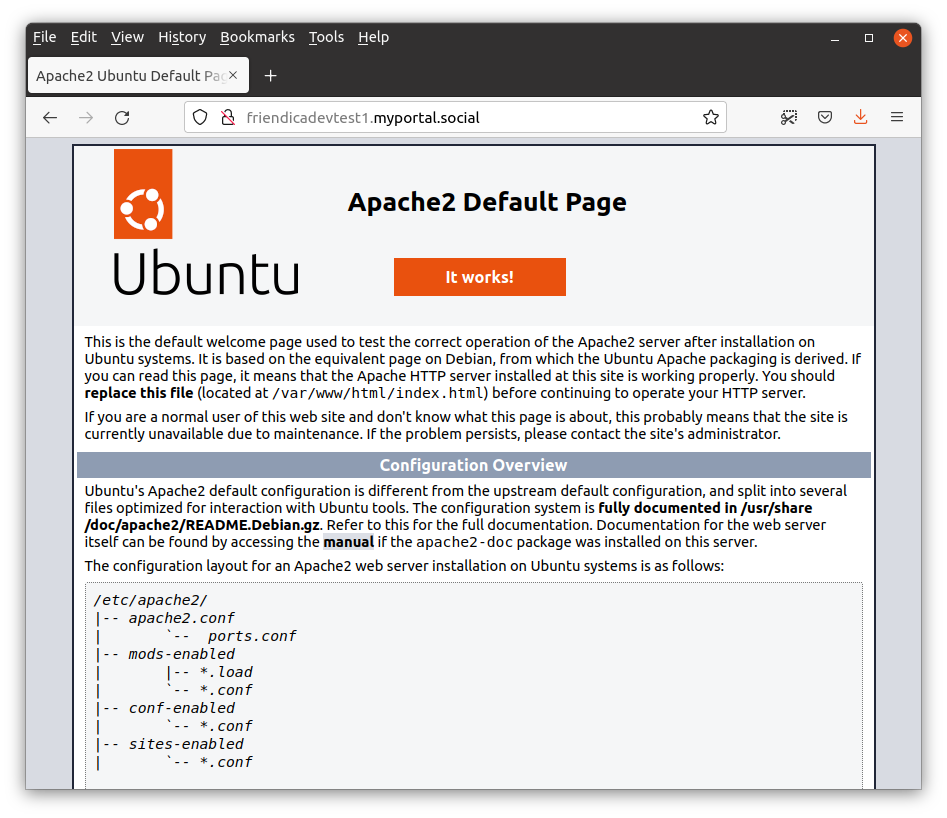
Notice the scratched out padlock? This is because we navigated to the HTTP version not the secured HTTPS version of the site. We will be setting up Certbot and the HTTP configuration in the next step to address that.
Install Certbot and Setting up HTTPS
Certbot is an Electronic Frontier Foundation (EFF) project to make it easy to create certificates for your website and properly secure it for HTTPS. During the setup it will automatically configure your Apache server to host HTTPS and redirect HTTP traffic to the HTTPS site. This is the exact behavior we want. Once you setup Certbot here it will also automatically update your certificates. We are following their Apache on Ubuntu install instructions for this stage. First we need to update our Snap repository and install the Snap of Certbot (Snap is an app packaging system that is installed by default Ubuntu):
sudo snap install core; sudo snap refresh core
sudo snap install --classic certbot
Next we need to create a symbolic link from the Certbot snap to the usr/bin folder so that it is discoverable by the command line tools.
sudo ln -s /snap/bin/certbot /usr/bin/certbot
Now we are ready to run Certbot to get our certificates and configure our system:
sudo certbot --apache
You will be prompted for several options. The defaults should be fine for most but there are some things that will be specific to your instance. For the sake of explicitness:
- Enter the email address you want notifications from the Certbot team and that you are comfortable sharing with them and others.
- Select Yes once you’ve read the terms of service
- Select Yes if you want to get more general EFF emails (optional)
- On the Please enter the domain name(s) you would like on your certificate (comma and/or
space separated) (Enter ‘c’ to cancel): prompt it is important to put the full accurate domain name in. This is what will be used for name matching when the certificate is issued and used. For our server it is
friendicadevtest1.myportal.social.
After you do those options you will get a series of prompts with statuses. When it is completed you should be able to navigate to the HTTPS version of your website. In fact if you intentionally try to go to the HTTP version of your website it should redirect to the HTTPS version instead. Try this out to be sure this step has been completed successfully.
Configuring a Firewall
A firewall is an important security measure for your server to limit available surfaces that hackers can use. Firewalls can be configured either in your cloud provider or on the local server. Ubuntu Server by default ships with the UFW firewall software. For this tutorial we will configure the firewall locally. The main gist is that you should be only opening up the necessary ports for SSH, HTTP, and HTTPS. Execute the following commands:
sudo ufw allow ssh
sudo ufw allow http
sudo ufw allow https
sudo ufw enable
With those executed you should now check the status with the sudo ufw status command which should return:
Status: active

To                         Action      From
--                         ------      ----
22/tcp                     ALLOW       Anywhere
80/tcp                     ALLOW       Anywhere
443                        ALLOW       Anywhere
22/tcp (v6)                ALLOW       Anywhere (v6)
80/tcp (v6)                ALLOW       Anywhere (v6)
443 (v6)                   ALLOW       Anywhere (v6)
Configure Fail2Ban
Fail2Ban is another important tool for thwarting hackers. It basically detects if some computer is brute force attacking or excessively hitting your server and applies escalating blocks on that IP address. I cribbed off of this tutorial while writing the below instructions. To install:
sudo apt install fail2ban -y
sudo systemctl enable fail2ban
sudo systemctl start fail2ban
Check the status after install with systemctl status fail2ban which should show the status as active.
Reboot Check
This is technically superfluous but I like double checking all of the above is properly configured to start up when the machine reboots. Therefore do a sudo reboot to restart the server and ensure that your website is still being served and both the firewall and fail2ban properly started up. With that we are ready to begin the installation of Friendica itself.
Friendica Install
Install Dependencies
Friendica requires several dependencies to properly run. One of them is the already installed Apache server. The rest include PHP, the MariaDB SQL database, and some other software. To finish them all execute the command:
sudo apt update
sudo apt install mariadb-server php libapache2-mod-php \
     php-common php-gmp php-curl php-intl php-mbstring \
	 php-xmlrpc php-mysql php-gd php-imagick php-xml \
	 php-cli php-zip php-sqlite3 curl git -y
Secure the Database
By default MariaDB has some insecure options to make it easier to begin development. This however is a production system. There is a convenient tool to properly secure the database called mysql_secure_installation (it’s called MySQL not MariaDB because MariaDB is a fork of the MySQL project). The recommended options below are for if you have configured your system only allowing SSH logins with SSH key pairing not username/password style logins. If you still allow username/password logins then follow the recommended defaults in the script. If you are correctly configured you should see prompts that read like “You already have your root account protected, so you can safely answer…” throughout the configuration steps.
Execute the command:
sudo mysql_secure_installation
The values for each of the prompts should be:
- Enter current password for root (enter for none): Just hit enter since you are configured to only allow logins with SSH keys for the root user.
- Switch to unix_socket authentication: n
- Change the root password?: n
- Remove anonymous users? Y
- Disallow root login remotely? Y
- Remove test database and access to it? Y
- Reload privilege tables now? Y
Create the Friendica database
Now that we have a properly secured MariaDB database server it is necessary to create a database for our Friendica site and a user that it can use to interact with it. We will do this with the mysql command line tool. The template code that you will use is:
CREATE DATABASE friendicadb;
CREATE USER 'friendica'@'localhost' IDENTIFIED BY '<password>';
GRANT ALL ON friendicadb.* TO 'friendica'@'localhost';
FLUSH PRIVILEGES;
EXIT;
The first line creates our Friendica database which the software will fill in on initialization, named friendicadb. The Second line creates the user Friendica will use for interacting with the server. In this case it is named friendica. The second part is the password for that user. The third line makes it so that the Friendica user has permissions to do anything and everything with the friendicadb database. The last two lines makes it so those permissions changes are applied immediately and the mysql command exits.
Before you paste this command into the mysql tool you need to change the <password> field to be an actual password. Since this is a production system this needs to be a legitimate password. I recommend using the command line tool pwgen (install with sudo apt install pwgen if it isn’t on your system already) to build one using the command pwgen 32 1. Keep these username and password values ready for later when we configure the website.
To execute the command you can simple launch the mysql tool with mysql and then paste the text into your terminal.
Install Friendica from the GitHub Repository
The Friendica software is maintained on a GitHub server where the latest release can be found at the head of the stable branch. There are several ways to install Friendica but using this Git method allows for a much easier update process later.
With the default Apache installation the /var/www/ directory is owned by root. We will want to instead make this whole directory and sub-directory to be owned by the Apache process’s user www-data.
sudo chown -R www-data:www-data /var/www
We will now want to execute the rest of the commands as that user so we execute the sudo command on the bash shell to make all subsequent command execute as the www-data user in the root of the /var/www directory:
cd /var/www
sudo -u www-data bash
Next we are going to use the fact that the default Apache site that is already configured is looking for the /var/www/html directory. We will move the original default site to a backup location
mv html html.bak
Next we will checkout the head of the stable branch of Friendica and have it output to the /var/www/html directory:
git clone https://github.com/friendica/friendica.git -b stable html
If you do an ls -l command here you should now see again an html directory owned by www-data. For example:
drwxrwxr-x 19 www-data www-data 4096 Jul 23 21:12 html
drwxr-xr-x  2 www-data www-data 4096 Jul 23 20:26 html.bak
Now we need to configure the site’s PHP dependencies:
cd html
bin/composer.phar install --no-dev
Once the dependencies are installed we need to create a folder for the output of the page view renderings by the Smarty Templating Engine :
mkdir -p view/smarty3
chmod 775 view/smarty3
We now want to bring in the addons which are in another repository:
git clone https://github.com/friendica/friendica-addons.git -b stable addon
Lastly we need to copy the htaccess permissions file to its appropriate location from the template to its correct location to help protect our directory (e.g. hiding the .git folder):
cp .htaccess-dist .htaccess
Now we need to tweak the configuration of the Apache site to allow overrides so that dynamic pages can be built correctly. These commands need to be run as root so if you are in a terminal where you are still sudo’d in as www-data user exit that.
sudo nano /etc/apache2/sites-available/000-default-le-ssl.conf
In this file you need to add the Directory configuration settings to the site configuration. A potential place would be under the DocumentRoot /var/www/html line:
<Directory /var/www/html>
    AllowOverride All
</Directory>
So the full file would look like this (for the configuration files as automatically created at the time of this writing):
<IfModule mod_ssl.c>
<VirtualHost *:443>
	# The ServerName directive sets the request scheme, hostname and port that
	# the server uses to identify itself. This is used when creating
	# redirection URLs. In the context of virtual hosts, the ServerName
	# specifies what hostname must appear in the request's Host: header to
	# match this virtual host. For the default virtual host (this file) this
	# value is not decisive as it is used as a last resort host regardless.
	# However, you must set it for any further virtual host explicitly.
	#ServerName www.example.com

	ServerAdmin webmaster@localhost
	DocumentRoot /var/www/html
    <Directory /var/www/html>
        AllowOverride All
    </Directory>
	# Available loglevels: trace8, ..., trace1, debug, info, notice, warn,
	# error, crit, alert, emerg.
	# It is also possible to configure the loglevel for particular
	# modules, e.g.
	#LogLevel info ssl:warn

	ErrorLog ${APACHE_LOG_DIR}/error.log
	CustomLog ${APACHE_LOG_DIR}/access.log combined

	# For most configuration files from conf-available/, which are
	# enabled or disabled at a global level, it is possible to
	# include a line for only one particular virtual host. For example the
	# following line enables the CGI configuration for this host only
	# after it has been globally disabled with "a2disconf".
	#Include conf-available/serve-cgi-bin.conf


ServerName friendicadevtest1.myportal.social
SSLCertificateFile /etc/letsencrypt/live/friendicadevtest1.myportal.social/fullchain.pem
SSLCertificateKeyFile /etc/letsencrypt/live/friendicadevtest1.myportal.social/privkey.pem
Include /etc/letsencrypt/options-ssl-apache.conf
</VirtualHost>
</IfModule>
Now restart the Apache server to make the change take effect and confirm that it is still active and running with that change:
systemctl restart apache2
systemctl status apache2
Tweaking Apache2 settings
While the default Apache settings should be mostly okay there are some tweaks you may want to consider to them. The settings can be found in the /etc/php/8.1/apache2/php.ini file which will be editable as a sudo’d user.
sudo nano /etc/php/8.1/apache2/php.ini
Updates to the settings recommended are:
Up the memory limit available to each Apache daemon to 256 MB:
memory_limit = 256M
Constrain upload sizes to 100 MB. You will also have a setting in the Friendica administrator panel which will limit uploads through Friendica proper. Make sure this value is greater than that at least:
upload_max_filesize = 100M
Allow PHP scripts to execute up to 300 seconds before timing out:
max_execution_time = 300
Allow up to 1500 query parameter or form variables on requests to the server:
max_input_vars = 1500
Now restart the Apache process again and make sure it is running by checking that the status is active:
systemctl restart apache2
systemctl status apache2
Initialize the Friendica Site
Friendica has a graphical wizard that runs through the website to configure things. There are also command line configuration options mentioned in the main install instructions . If everything is configured correctly above however this graphical method should work. Navigate to your Friendica site’s URL and you should see the below status board:
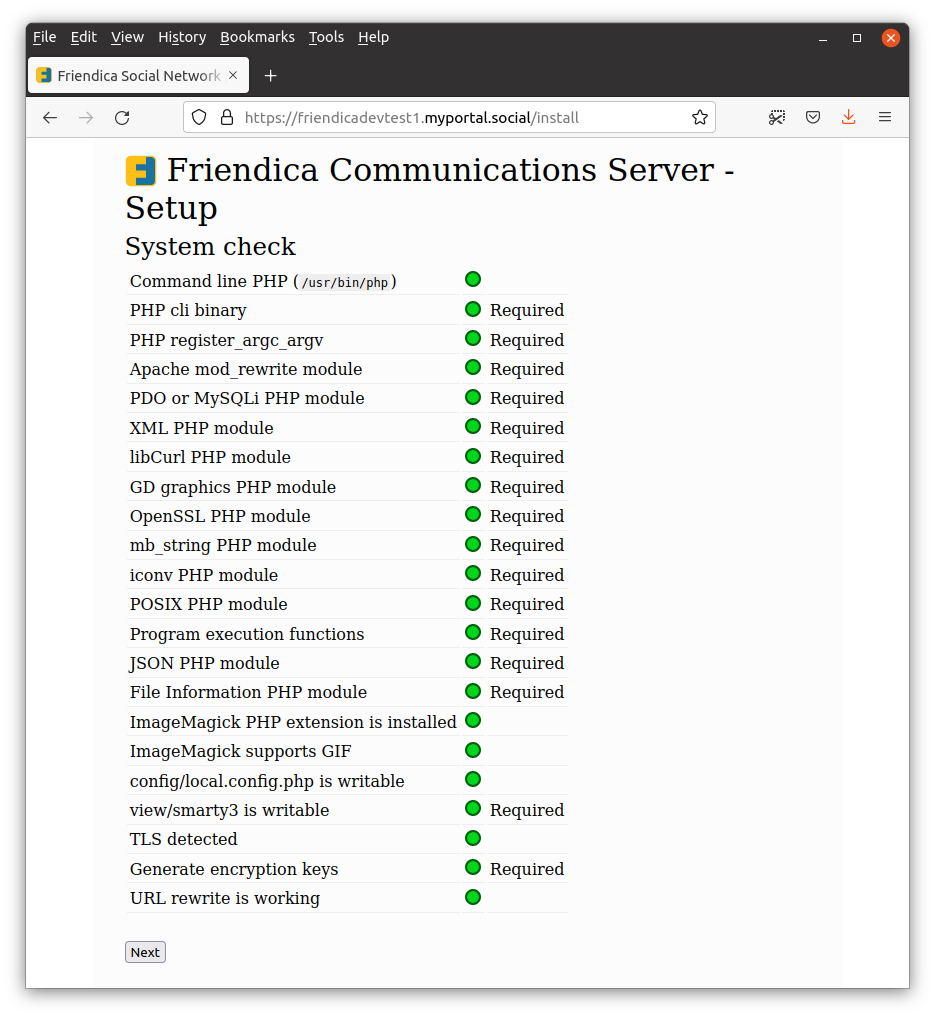
You should see all green bubbles for the status. If you do not then a previous step was not completed correctly. This could cause problems with the site configuration and execution in the next steps. Assuming you are all green hit the “Next” button. You will move on to the second screen of the install wizard:
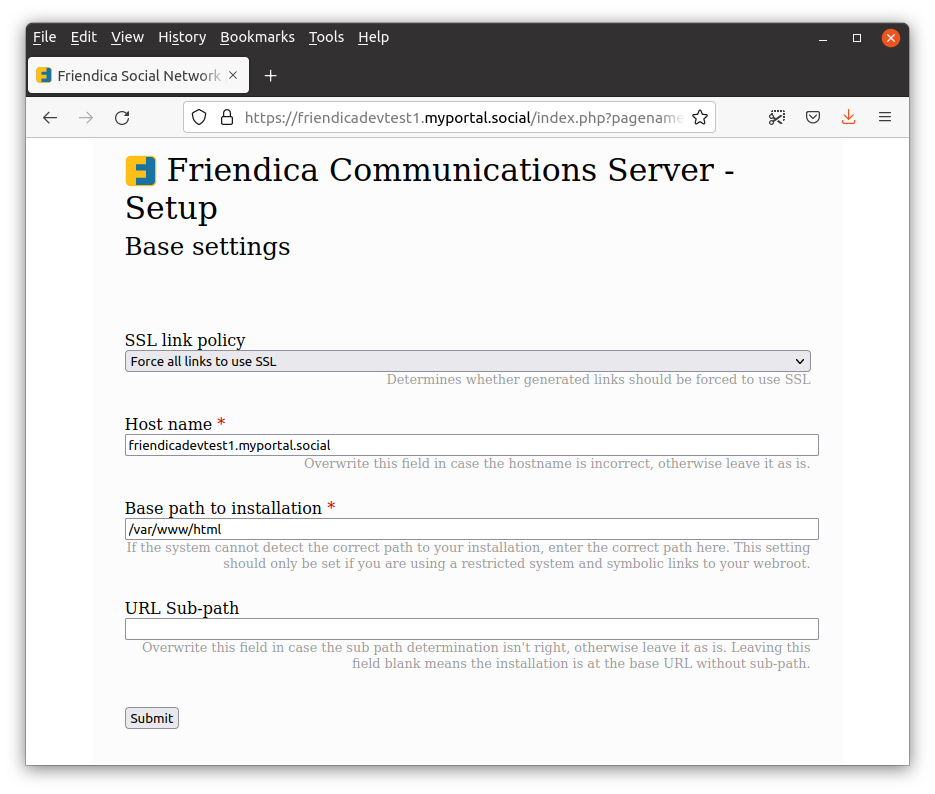
These are the base settings for the Friendica site. You should leave the SSL policy as the default. The hostname needs to be the full host name that you are using to get to the site. This is the same one that is in your SSL certificate as you defined in Certbot. You can see how in the screenshot it matches the base URL for the site. The base path for installation default of /var/www/html is correct as is the URL sub-path being empty. Click the “Next” button to move on to the third step of the configuration:
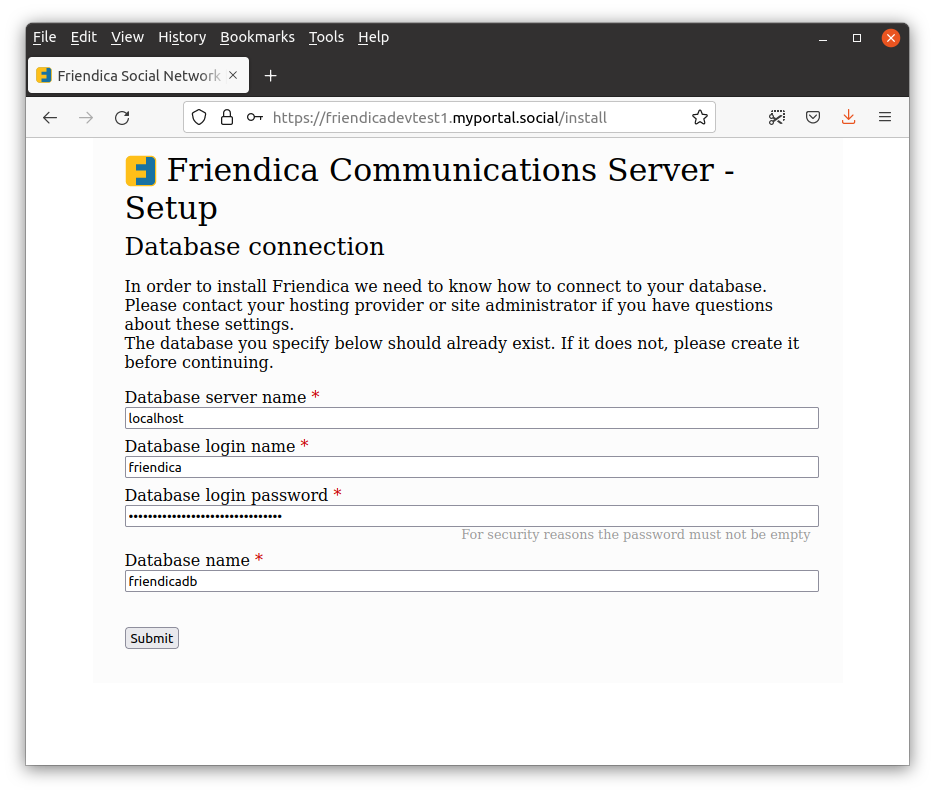
This screen sets up the database configuration. These are the values that you should have kept around from the previous database setup step. The database is being run on the same server so the host is localhost. The username for Friendica use is friendica with the strong password that you created for that user in the previous step. Lastly our database is named friendicadb. Hit the “Submit” button to move on to the final step:
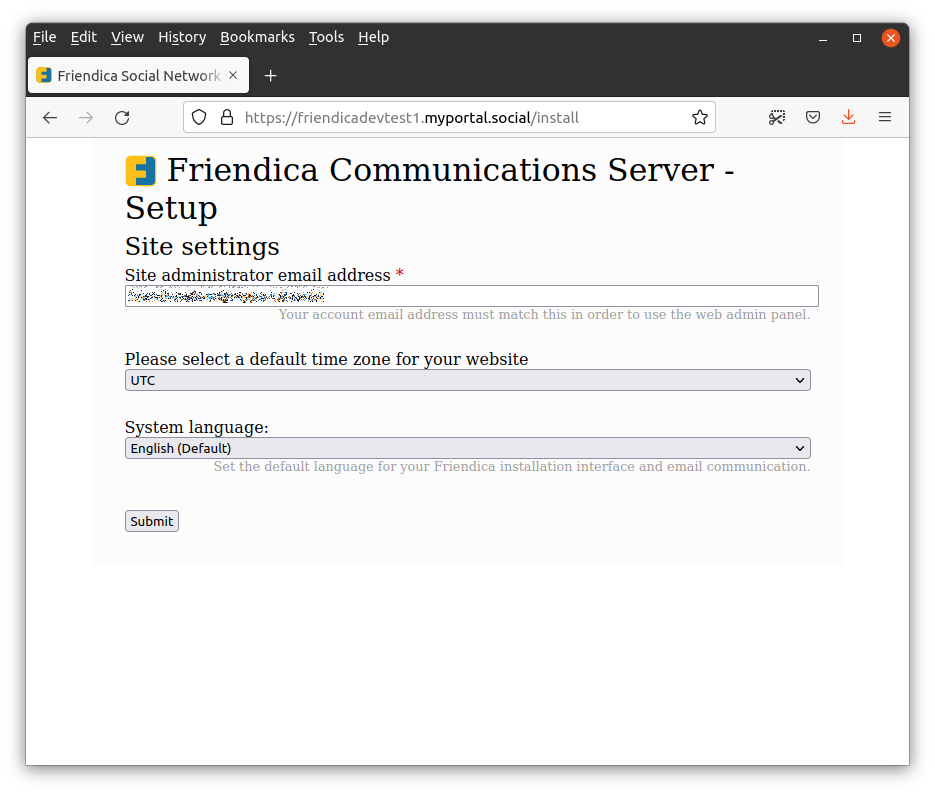
This last step configures the email address of the administrator and the regional setting. No users are created by default by Friendica. When you create a user that has the email address specified here that user will be designated as the site administrator. You therefore want to make sure that this is the email address you want to use for that purpose. The time zone and the default language are your own preference. Hit the “Submit” button which should finish the configuration process.
Create Administrator User
You are now ready to create your administrator user. Click on the “register” hyperlink on the final wizard page or navigate to the server root in the browser and click on the register link. You will be presented with the registration page:
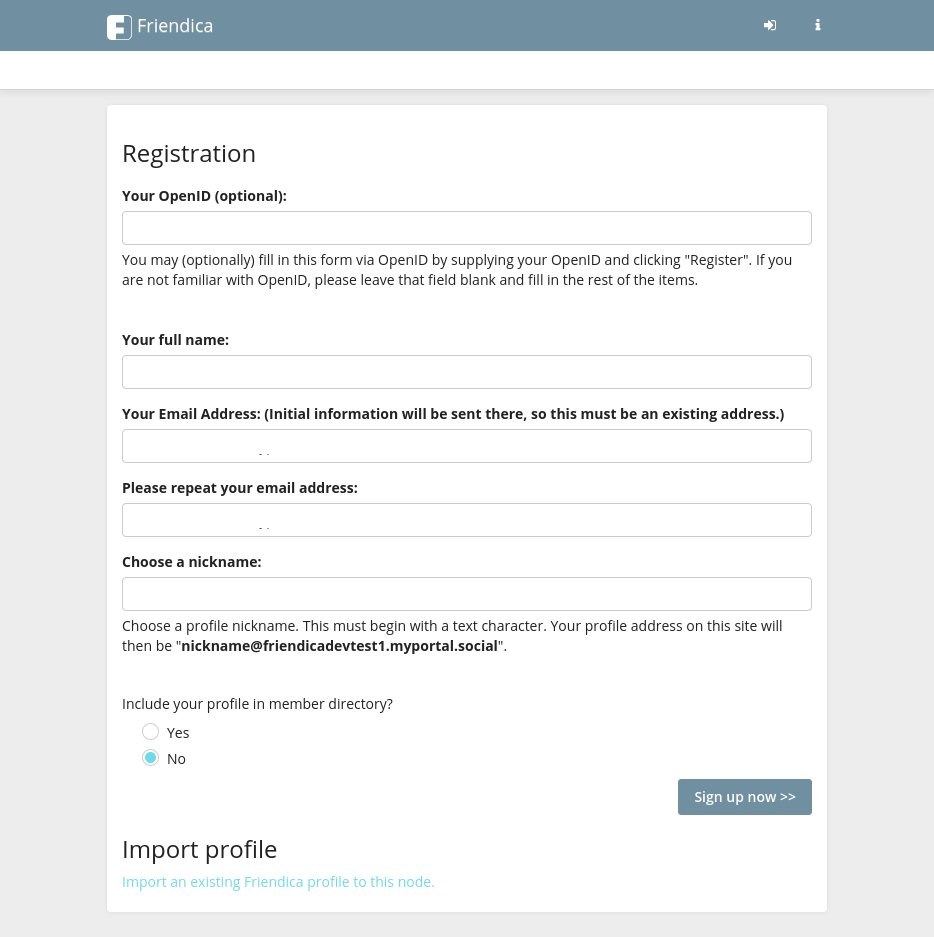
For this first user you’ll want to create the administrator. I personally have a separate administrator account from my main posting profile. I leave that user hidden from the member directory as well. This makes it necessary to log in separately for doing administration things however. Regardless of whether you use the same account for administration and posting or not this first user should be the site administrator. This is done by using the same email address that you specified as the administrator email address in the wizard screen. Once you have those settings created and submitted you will get taken to a new screen with a toast box pop-up in the upper right corner with your credentials like below:
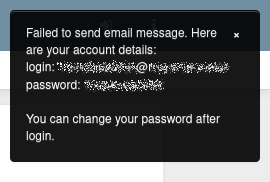
You will want to record this password for needed login. Go to the main page and try to log into the server using these new credentials and you should be brought to the standard home screen.
Creating Workers
A lot of the work of the Friendica site is done by worker processes. There are two ways to setup the system to regularly call these. One is via a daemon process that needs to be created every time the server starts, either manually or through systemd. Another is to create a cron job that gets called on a regular interval. We will do the easier cron job method to start. First log into the server through SSH using your root@<domain> user. Then execute the crontab edit command:
sudo crontab -e
If it prompts you for an editor choose whichever you are most comfortable with. Nano will be easiest for new users. In the cron settings add a line for our worker process:
*/10 * * * * cd /var/www/html; /usr/bin/php bin/worker.php
The details of a cron job configuration are out of scope but this tutorial provides a good introduction
. This configuration here though will go into the /var/www/html directory and kick off a worker every ten minutes. When run this way workers automatically exit. Confirm the settings are there by executing the below command after you exit the crontab editor
crontab -l
Setup sendmail
As you may have noticed in the toast box in the first registration step, Friendica is not able to send out emails yet. This is because the outgoing email system isn’t configured on the server yet. We will need to configure that now. Why didn’t we configure that before we created an account? Depending on your email provider legitimate emails from this server may get stuck in a spam filter or worse be totally blocked altogether. For example GMail will most likely not even allow them to get through at all. Therefore you’d never get your registration email with your password.
The below instructions are for setting up a local sendmail server so we can send out emails directly from the server. If you have a domain email provider you probably will want to setup an SMTP relay through that using the PHPMailer Friendica addon. The instructions below were cribbed from this guide
.
First thing we want to do is to make sure that the domain is properly setup in the /etc/hosts file. What we are looking for is our full domain to be listed either against the 127.0.0.1 or 127.0.1.1 loop back addresses. For example on the friendicadevtest1 machine the entries read:
127.0.1.1 friendicadevtest1 friendicadevtest1.myportal.social
127.0.0.1 localhost
Notice that the local hostname is first followed by the internet wide address. When we setup sendmail it will use that information for formulating our email transmissions.
Next we install sendmail proper
sudo apt install sendmail
At this point we should be good to go. Test this by trying to create a new temporary user. Rather than the toast box with your credentials you should get a notification that an email was sent. You can then confirm that the email is received in your inbox or spam folder. Again, if you use a GMail address this step may not complete with this configuration because it will totally block the email.
Conclusion and Next Steps
At this point you now have a fully configured Friendica server ready for use by yourself or other users. There are some additional configuration steps that you may want to tweak on your system however. First, you will want to walk through your administration settings. If you are logged in to the administrator user it will be a menu option in the drop down menu when you click on your profile icon in the upper right corner. There are lots of settings which one can configure. First one you definitely want to decide on is if you want to allow users to create accounts and if there are any limitations. By default anyone can create any number of accounts. You may want to make it so that accounts have to be approved by the site administrator. You may also want to require full names to help cut down on bot creation as well. You may also want to increase the maximum image file size upload, which defaults to 800 KB. Familiarizing yourself with these settings is outside the scope of this tutorial but worth doing. Eventually you will also need to do an upgrade, which is something to become familiar with as well but outside the scope of this tutorial.
Happy serving and surfing in the fediverse.